
Installing pool equipment without proper knowledge leads to costly mistakes, equipment damage, and safety hazards that plague pool owners for years. Missing a single critical step can result in leaks, inefficient operation, and premature equipment failure that turns your dream pool into a maintenance nightmare. This comprehensive guide provides detailed instructions for installing pool equipment correctly the first time, ensuring optimal performance, longevity, and trouble free operation for your swimming pool system.
Pool equipment installation requires careful planning, technical knowledge, and attention to detail. Your pool system consists of multiple interconnected components including pumps, filters, heaters, sanitizers, and control systems that must work together seamlessly. Understanding how these components interact helps you create an efficient, reliable pool system.
Professional swimming pool equipment installation follows industry standards and manufacturer specifications. Proper installation directly impacts system efficiency, operational costs, and equipment lifespan. Taking time to plan and execute installation correctly saves money and frustration over the long term.
The installation process involves mechanical connections, plumbing work, electrical wiring, and system testing. Each component requires specific installation procedures, proper positioning, and correct integration with other system elements. Following manufacturer guidelines ensures warranty protection and optimal performance.
Modern pool systems increasingly incorporate advanced features like variable speed pumps, automated controls, and energy efficient components. Understanding these technologies during installation maximizes their benefits and ensures proper operation. Quality pool equipment types vary in complexity and installation requirements.

Successful pool equipment installation requires specific tools for different tasks. Pipe cutters, wrenches, screwdrivers, drill with bits, level, measuring tape, and pipe thread sealant form the foundation of your tool collection. Having proper tools prevents damage to equipment and ensures secure, leak free connections.
PVC pipe working tools including cutters, primer, cement, and deburring tools are essential for plumbing connections. These specialized tools create proper joints that withstand pressure and prevent leaks. Learn proper techniques for gluing PVC pipes to ensure durable connections throughout your system.
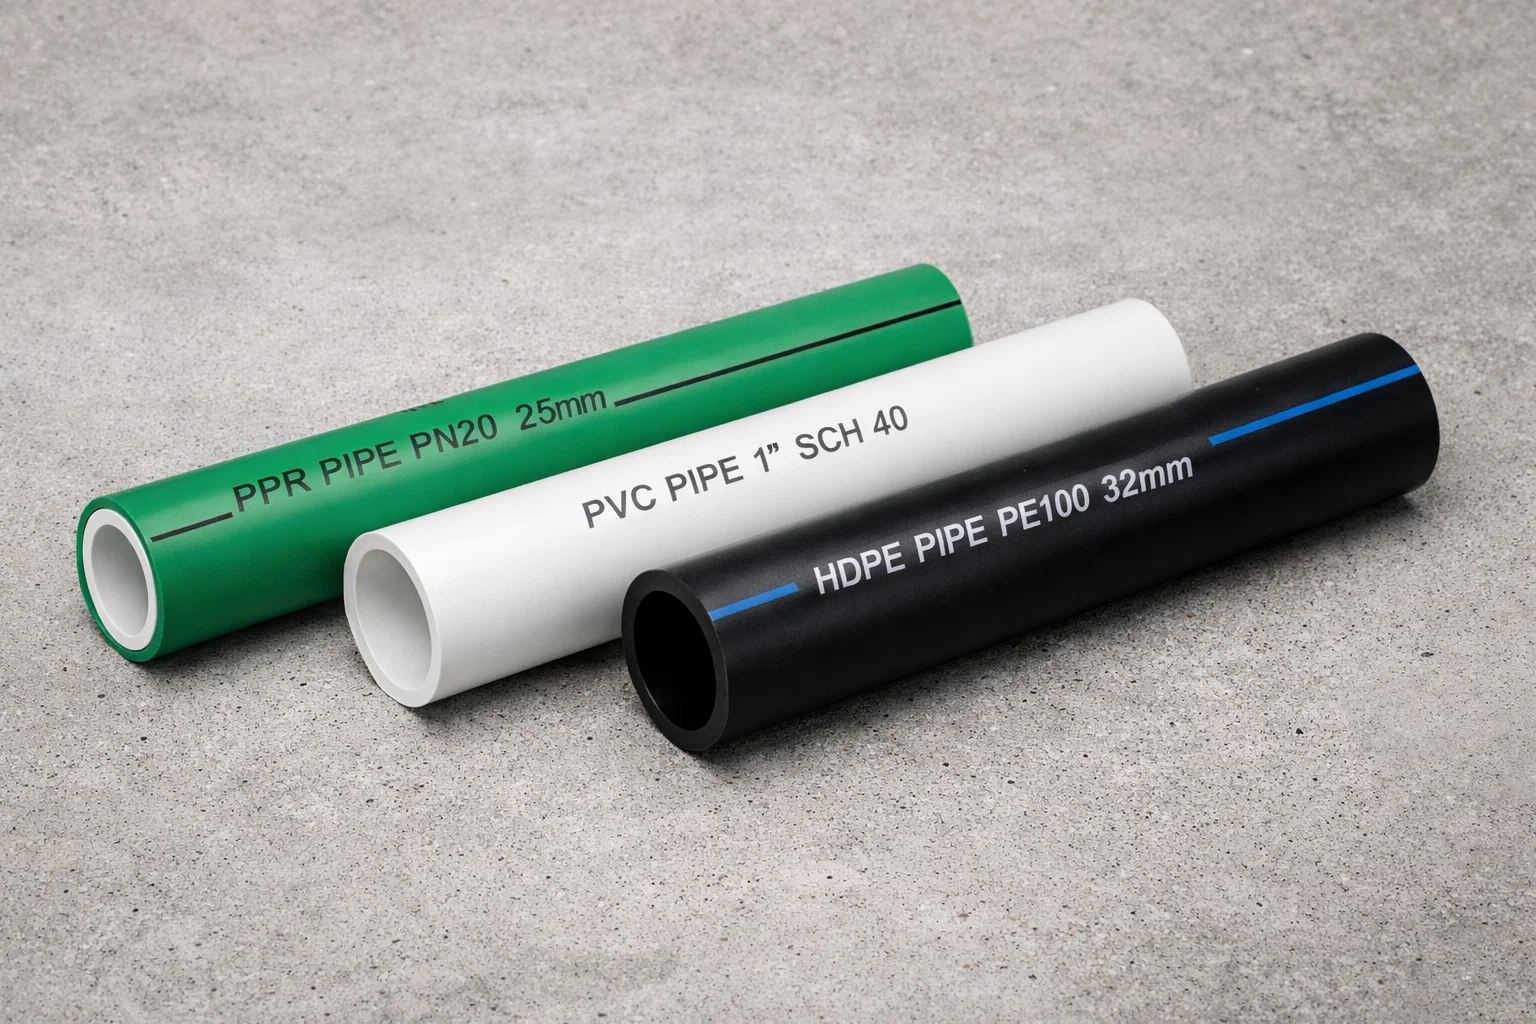
High quality PVC pipes and fittings form the backbone of your pool plumbing system. Selecting appropriate pipe materials ensures compatibility with chemicals, pressure requirements, and local building codes. Schedule 40 PVC typically serves residential pool applications, while Schedule 80 provides additional strength for high pressure situations.
Understanding PVC pipe specifications helps you select proper materials for different system sections. Return lines, suction lines, and equipment connections each have specific pressure and flow requirements. Matching pipe size and type to these requirements optimizes system performance.
Waterproof electrical boxes, conduit, wire appropriate for outdoor use, circuit breakers, and GFCI protection are mandatory for safe electrical installations. Pool equipment operates in wet environments requiring special electrical considerations. All electrical work must comply with National Electrical Code and local regulations.
Safety glasses, gloves, appropriate clothing, and first aid supplies protect you during installation. Working with chemicals, power tools, and heavy equipment presents various hazards. Proper protective equipment prevents injuries and ensures safe working conditions throughout the installation process.
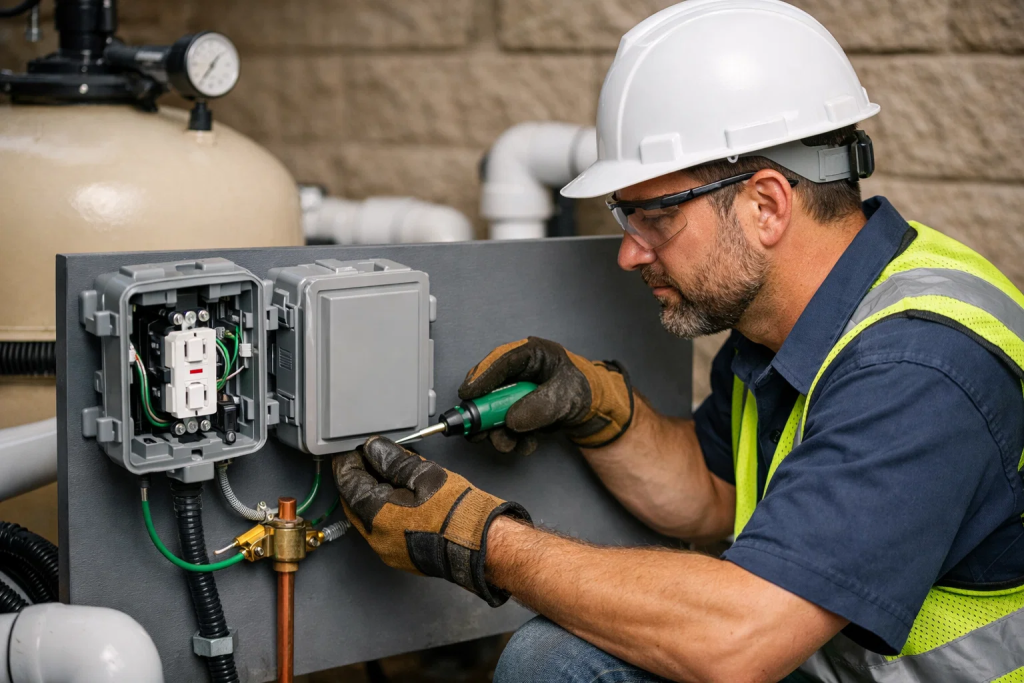
Turn off all power at the main breaker before beginning any electrical work. Pool equipment operates on 120V or 240V circuits that can cause severe injury or death. Never work on live circuits or assume power is off without verifying with a voltage tester. Electrical safety is paramount during pool equipment installation.
GFCI protection is required for all pool equipment electrical connections. Ground Fault Circuit Interrupters detect current leakage and shut off power instantly, preventing electrocution. Install GFCI breakers in the service panel or use GFCI receptacles at equipment locations.
Pool chemicals are corrosive and potentially dangerous. When installing sanitization equipment or priming systems, handle chemicals carefully following manufacturer safety data sheets. Wear appropriate protective equipment and work in well ventilated areas.
Verify equipment pad can support the weight of all installed equipment. Concrete pads must be level, properly reinforced, and adequately sized. Equipment vibration can crack undersized or poorly constructed pads, leading to equipment damage and plumbing failures.
If installing gas heaters, have licensed professionals handle all gas line work. Gas leaks create fire and explosion hazards requiring expert installation. Never attempt DIY gas line installation or modification.
Choose equipment locations considering access, noise, visibility, and maintenance requirements. Equipment pads should be easily accessible for service while remaining unobtrusive. Placing equipment too far from the pool increases plumbing costs and reduces efficiency due to friction loss.
Minimize pipe runs between pool and equipment to reduce energy consumption and improve performance. Each foot of pipe creates resistance reducing flow rate and increasing pump workload. Strategic equipment placement optimizes hydraulic efficiency and lowers operating expenses.
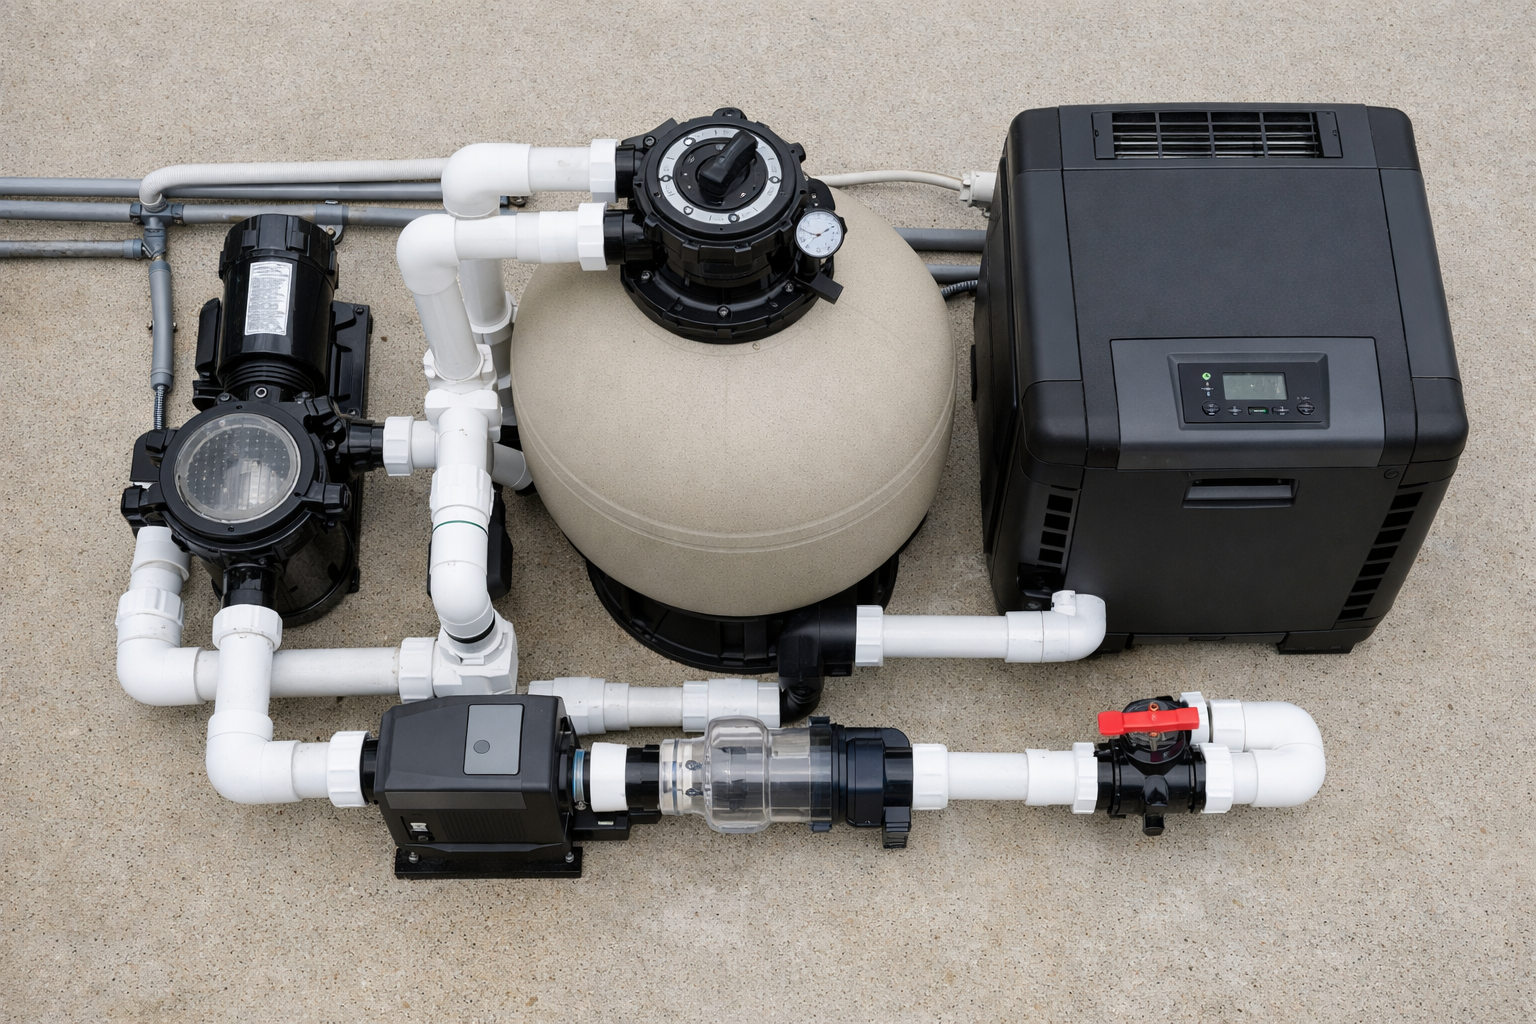
Arrange equipment in proper sequence: skimmer to pump, pump to filter, filter to heater, heater to sanitizer, sanitizer to pool returns. This standard configuration ensures each component receives water in the proper condition. Incorrect sequencing can damage equipment or reduce effectiveness.
Provide adequate clearance around each component for maintenance access, airflow, and service. Manufacturers specify minimum clearances for safe operation and proper ventilation. Crowded equipment areas make maintenance difficult and increase risk of overheating or damage.
Design plumbing runs to minimize elbows, tees, and directional changes that restrict flow. Each fitting creates friction loss reducing system efficiency. Sweep elbows and gentle bends maintain better flow characteristics than sharp 90 degree turns.
Understanding underground PVC pipe installation principles applies to equipment pad plumbing. Proper slope, support, and burial depth prevent future problems with shifting or settling.
Position the pump as close to pool water level as possible to minimize suction lift. Pumps work more efficiently pushing water than pulling it. Excessive suction lift causes cavitation, noise, and reduced performance.
Mount the pump on a stable, level base using manufacturer provided hardware. Secure mounting prevents vibration transmission to plumbing and structures. Rubber isolation pads reduce noise and vibration further improving system operation.
Install the pump below water level when possible to maintain prime automatically. Self priming pumps handle installations above water level but require proper priming procedures. Check valve installation prevents prime loss when pump shuts off.
Connect skimmer and main drain lines to pump suction port using proper sized PVC pipes. Undersized suction piping restricts flow causing pump starvation. Follow pipe measurement guidelines to ensure adequate suction line sizing.
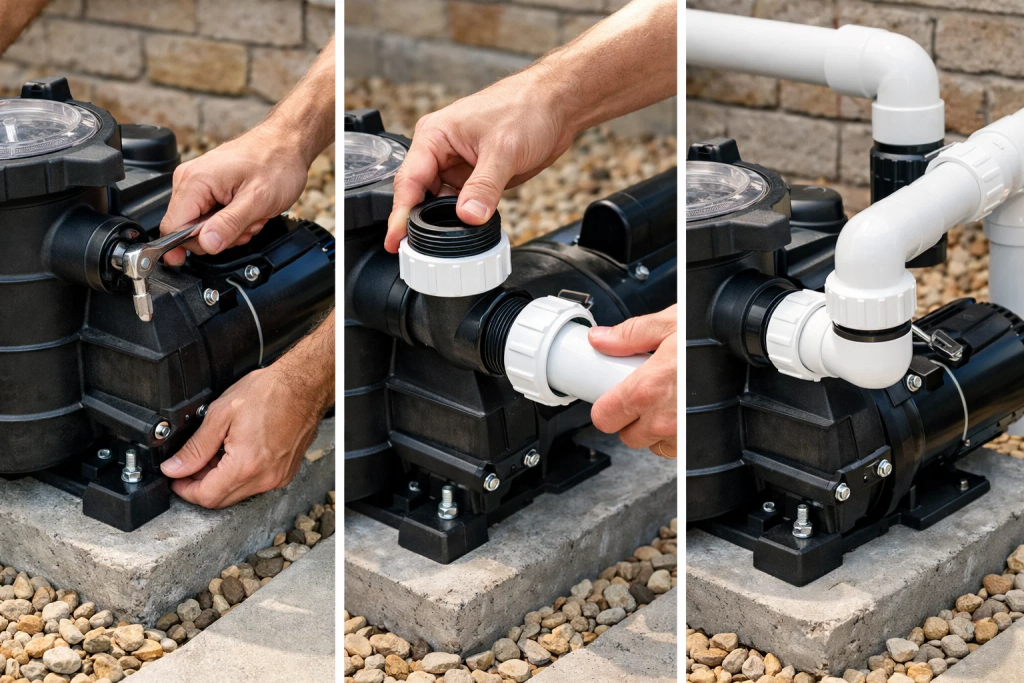
Use union connections at pump for easy removal during maintenance. Unions allow pump disconnection without cutting pipes. Apply thread sealant to male threads and hand tighten unions to prevent leaks.
Install suction side valves to control water source selection. Three way valves allow switching between skimmer and main drain independently. Never restrict suction side flow completely as this damages pumps.
Connect pump discharge to filter inlet using appropriately sized PVC pipe. Discharge piping typically uses smaller diameter than suction due to higher pressure. Install unions at both pump discharge and filter inlet for maintenance flexibility.
Install a check valve in the discharge line if backflow prevention is needed. Check valves prevent reverse flow during pump shutdown. Position check valves correctly following directional arrows on valve body.
Proper PVC pipe cutting techniques ensure clean, square cuts for leak free joints. Deburr all cut pipe ends to prevent turbulence and O ring damage in union connections.
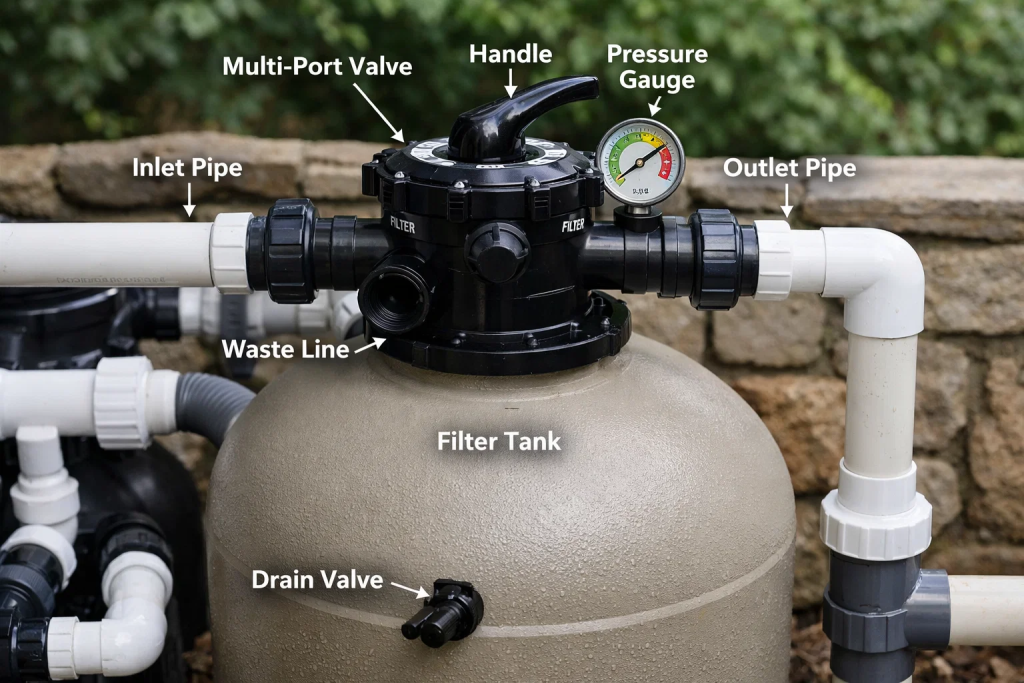
Position sand filter within easy reach of pump discharge and plumbing runs. Sand filters are heavy requiring stable mounting surfaces. Verify concrete pad can support filled filter weight plus equipment.
Install multi port valve according to manufacturer instructions ensuring proper orientation. Valve positions must align with operational requirements for filtering, backwashing, rinsing, and waste functions. Incorrect valve installation causes operational problems and potential equipment damage.
Add filter sand in stages, filling with water periodically to prevent laterals damage. Pouring all sand at once can crack internal components. Use proper gradation sand specified by manufacturer for optimal filtration.
Connect backwash line to proper drainage following local codes. Backwash water contains concentrated contaminants requiring proper disposal. Never backwash onto landscaping or areas where runoff enters storm drains. Understanding drainage pipe types helps plan proper backwash disposal.
Mount cartridge filter housing on stable surface ensuring easy cartridge access. Cartridge filters require regular removal for cleaning. Position filter where cartridge removal doesn’t interfere with other equipment.
Install pressure gauge on filter housing to monitor performance. Rising pressure indicates cartridge loading requiring cleaning. Pressure monitoring prevents excessive resistance damaging pumps.
Connect inlet and outlet ports using unions for easy disconnection. Cartridge filters need complete removal for thorough cleaning. Union connections eliminate cutting pipes for filter removal. Review cartridge filter cleaning procedures to understand maintenance requirements.
After completing filter installation, perform pressure tests to verify leak free operation. Proper testing identifies problems before filling pool. Testing procedures similar to PVC pipe pressure testing confirm system integrity.
Install heaters outdoors in well ventilated areas away from combustibles. Heaters generate substantial heat requiring proper clearances. Manufacturer specifications detail minimum clearances from walls, vegetation, and other structures.
Position heater after filter in plumbing sequence but before sanitizers. Heating water before chemical treatment improves chemical effectiveness. Sanitizers added after heating prevent excessive chemical breakdown from high temperatures.
Ensure adequate gas supply for gas heaters or proper electrical service for electric heaters. Undersized utilities cause heater underperformance or failure. Professional utility installation ensures safe, code compliant operation.
Install heater bypasses allowing water flow during heater maintenance or removal. Bypass valves maintain pool circulation when heater is offline. Three way valves provide adjustable flow through or around heater.
Use unions on both inlet and outlet for easy heater removal. Heaters require periodic service and eventual replacement. Union connections simplify these procedures preventing plumbing modifications.
Install flow switches if required by heater manufacturer. Flow switches prevent heater operation without adequate water flow protecting heat exchangers. Proper flow switch installation prevents dry firing damage.
Gas heater venting must comply with manufacturer requirements and building codes. Improper venting causes dangerous carbon monoxide accumulation. Hire licensed professionals for gas heater venting installation.
Ensure exhaust outlets direct combustion gases away from occupied areas. Exhaust gases are hot and contain harmful compounds. Proper exhaust routing prevents health hazards and structure damage.
Install salt chlorine generators after heater in plumbing sequence. This positioning ensures water temperature stabilizes before chlorine generation. Mount control boxes in protected, easily accessible locations.
Follow manufacturer specifications for cell installation orientation and plumbing. Incorrect installation causes poor chlorine production and shortened cell life. Maintain proper flow rates through cells for optimal performance.
Install flow sensors and required safety devices per manufacturer requirements. Safety devices prevent cell operation during low flow conditions protecting equipment. Proper sensor installation ensures reliable automatic operation. Learn about salt chlorination systems for comprehensive understanding.
Install chemical feeders after heater and before return lines to pool. This positioning allows chemicals to mix thoroughly before reaching pool. Mount feeders securely preventing vibration loosening connections.
Use check valves preventing backflow into chemical feeders. Backflow can dilute chemicals or cause contamination. Install unions at feeder connections for easy maintenance access.
Ensure adequate ventilation around chemical storage and feed equipment. Chemical vapors are corrosive and potentially harmful. Proper ventilation prevents equipment degradation and health hazards.
Cut all PVC pipes square using proper cutting tools. Angled cuts create poor glue joints that leak under pressure. Clean cuts ensure maximum surface contact for strong bonds.
Dry fit entire plumbing system before applying primer and cement. Dry fitting identifies problems before permanent assembly. Mark pipe insertion depth on pipe and fittings ensuring proper engagement.
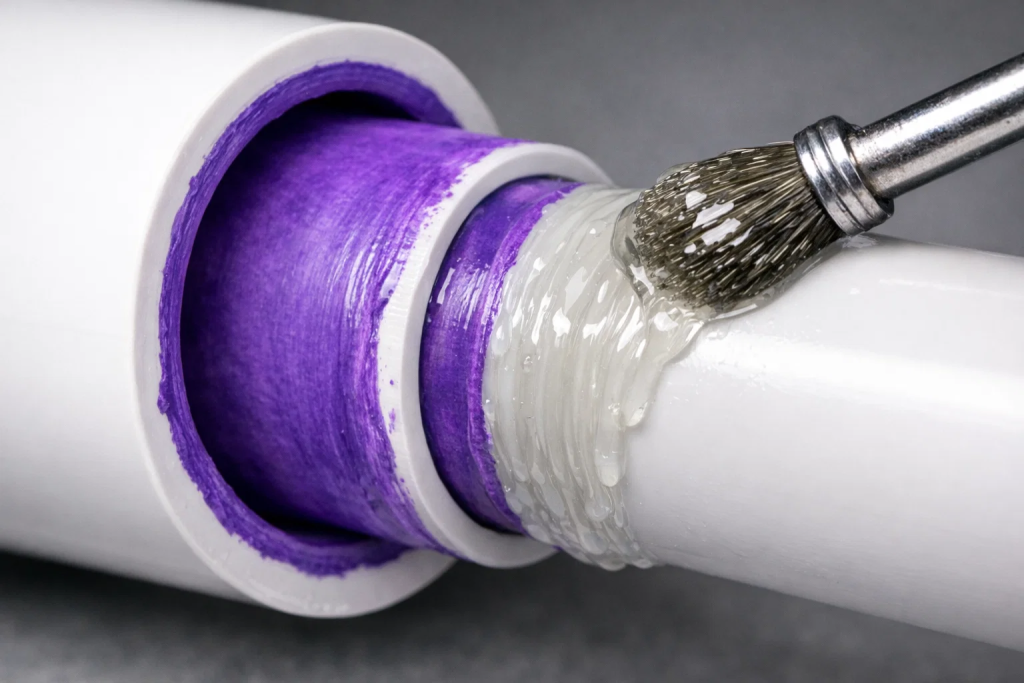
Apply PVC primer to both pipe and fitting surfaces. Primer softens plastic allowing chemical welding. Immediately apply PVC cement and assemble joint within 30 seconds.
Hold joints together for 30 seconds preventing push out during initial cure. Full cure requires several hours before pressure testing. Allow proper cure time before filling system with water. Mastering PVC pipe gluing techniques ensures durable, leak free plumbing.
Install valves in accessible locations with handles unobstructed. Valves require regular operation for system control. Inaccessible valves become maintenance problems over time.
Use appropriate valve types for different applications. Ball valves provide full flow with minimal restriction. Gate valves allow flow regulation but create more friction loss. Understanding PVC high pressure valves helps select proper components.
Install unions on both sides of valves allowing removal without cutting pipes. Union placement simplifies future valve replacement or service. Plan union locations during initial installation for maximum flexibility.
Support horizontal pipe runs every 3 to 4 feet preventing sagging. Unsupported pipes sag over time stressing joints. Use proper pipe hangers or supports rated for PVC pipe.
Anchor vertical runs preventing movement during operation. Water hammer and pressure surges can shift unsecured pipes. Secure anchoring maintains system integrity over years of operation.
Allow expansion movement in long pipe runs. PVC expands and contracts with temperature changes. Expansion loops or flexible connections accommodate movement preventing joint failure.
Understanding proper pipe bending methods helps create gentle direction changes without fittings. Heat bending reduces fitting count and improves flow characteristics.
Verify electrical service capacity matches equipment requirements. Pool equipment draws substantial current requiring adequate service. Undersized electrical service causes breaker trips and equipment underperformance.
Install dedicated circuits for major pool equipment. Pumps, heaters, and other equipment should not share circuits with other loads. Dedicated circuits prevent nuisance trips and ensure reliable operation.
Run electrical conduit from service panel to equipment following code requirements. Conduit protects wiring from physical damage and environmental exposure. Use weatherproof conduit rated for outdoor installation.
Install pull boxes at long conduit runs or multiple direction changes. Pull boxes allow wire installation without damage. Proper pull box placement simplifies future modifications or troubleshooting.
Bond all metal pool equipment and components together creating equipotential plane. Bonding prevents voltage differences causing shock hazards. Use proper gauge bonding wire connecting all metal components.
Ground electrical equipment according to code requirements. Grounding provides path for fault currents protecting people and equipment. Never omit or compromise grounding connections.
Install control panels in protected locations accessible for operation and service. Control systems operate equipment automatically based on programmed schedules. Weather resistant enclosures protect controls from environmental damage.
Wire control systems following manufacturer wiring diagrams exactly. Incorrect wiring causes equipment damage or creates safety hazards. Label all wires at both ends for future troubleshooting.
Inspect all connections, supports, and components before filling system. Visual inspection catches obvious problems before water damage occurs. Check for loose fittings, missing unions, or inadequate support.
Verify valve positions match intended operation mode. Valves in wrong positions prevent proper system operation. Rotate all valves through full range checking for obstructions or binding.
Fill system slowly monitoring all connections for leaks. Small leaks become obvious as pressure builds. Tighten connections or repair joints showing moisture.
Pressurize system to normal operating pressure and inspect thoroughly. Higher pressure reveals leaks that don’t show at low pressure. Mark any leak locations for repair before proceeding.
Test filter tank integrity per manufacturer procedures. Filter tanks operate under pressure requiring proper sealing. Failed tank seals cause catastrophic leaks damaging equipment.
Start pump and verify proper flow through all system components. Gurgling or unusual noises indicate air entrainment or flow problems. Bleed air from system through filter air release valve.
Check pressure readings at filter gauge. Pressure should match clean filter baseline. Excessive pressure indicates flow restrictions or undersized piping.
Verify return jets provide adequate flow and proper direction. Weak return flow indicates system problems needing correction. Adjust jet direction for optimal pool circulation.
Similar testing procedures to clearing blocked drainage pipes help identify flow restrictions in pool plumbing systems.
Air trapped in system prevents proper pump priming and circulation. High points in plumbing collect air creating flow restrictions. Install automatic air release valves at high points eliminating air pockets.
Prime pump properly before initial startup following manufacturer procedures. Dry running damages pump seals and impellers. Keep pump basket and suction lines filled during priming process.
Low pressure indicates flow restrictions, undersized piping, or clogged strainers. Check pump strainer basket and skimmer baskets first. Clean baskets before investigating other causes.
High pressure suggests filter loading, closed valves, or restricted return lines. Backwash sand filters or clean cartridge filters when pressure rises. Verify all valves are fully open in operating position.
Pipe joint leaks usually result from improper gluing or inadequate cure time. Cut out leaking joints and redo properly. Allow full cure time before pressurizing repaired joints.
Union leaks often come from damaged O rings or debris on sealing surfaces. Replace O rings and clean union surfaces before reassembly. Avoid overtightening unions as this damages O rings.
Equipment leaks may indicate defective components or improper installation. Check shaft seals, housing O rings, and tank seals. Contact manufacturer for warranty service on defective equipment.
Understanding leak repair techniques helps address problems quickly minimizing water loss and damage.
Equipment not starting usually indicates electrical connection problems or improper wiring. Verify power at equipment terminals using voltage tester. Check breaker panel for tripped breakers or loose connections.
GFCI tripping suggests ground fault somewhere in system. Moisture in electrical connections or damaged components causes ground faults. Dry connections and replace damaged parts before resetting GFCI.
New equipment requires monitoring during initial operation period. Watch for leaks, unusual noises, or performance problems. Address issues immediately preventing small problems from becoming major repairs.
Check all connections after 24 hours of operation. Thermal cycling may reveal leaks not apparent during initial testing. Tighten unions or repair joints showing moisture.
Establish routine inspection schedule checking all equipment and connections. Weekly inspections during swimming season catch developing problems early. Monthly inspections during off season maintain system readiness.
Monitor pressure gauges tracking filter performance over time. Pressure trends indicate filter condition and system health. Clean filters when pressure rises above normal operating range.
Keep detailed records of installation including equipment models, plumbing layout, and electrical configuration. Documentation simplifies troubleshooting and future modifications. Photograph installation before covering or concealing components.
Maintain equipment manuals and warranty information in accessible location. Manuals provide valuable troubleshooting and maintenance information. Warranty coverage requires proof of purchase and proper installation.
Prepare system for winter shutdown in cold climates preventing freeze damage. Drain all equipment and plumbing removing water that could freeze. Store removable components indoors protecting from weather.
Prepare system for summer startup checking all components before operation. Replace worn parts, clean filters, and inspect plumbing. Proper seasonal maintenance extends equipment life and prevents failures.
Professional suppliers like Dave Pools provide quality equipment and support for successful installations.
DIY pool equipment installation is possible for mechanically inclined individuals with proper tools and knowledge. However, electrical work requires licensed electricians in most jurisdictions, and gas heater installation demands professional expertise. Plumbing installation falls within DIY capabilities for many homeowners following proper procedures and local codes.
Pump sizing depends on pool volume, plumbing configuration, desired turnover rate, and additional features like waterfalls or spa jets. Proper sizing requires calculating total dynamic head and selecting pumps matching flow requirements. Undersized pumps provide inadequate circulation while oversized pumps waste energy and create excessive pressure.
Install pump below water level when possible ensuring automatic priming. Use check valves on suction lines preventing backflow when pump stops. Keep pump basket and strainer lids properly sealed eliminating air infiltration. Address any suction line leaks immediately as small air leaks prevent proper priming.
Manufacturer specifications detail minimum clearances for each equipment type. Typical requirements include 36 inches in front for service access, 24 inches on sides for ventilation, and adequate overhead clearance for tall equipment. Gas heaters require larger clearances from combustibles and adequate ventilation.
Rigid Schedule 40 PVC provides superior strength and longevity for permanent installations. Flexible PVC works well for temporary installations or tight spaces where rigid pipe is difficult. Most professional installations use rigid PVC for all permanent plumbing. Quality PVC pipe materials ensure long lasting, trouble free operation.
Allow minimum 2 hours cure time at temperatures above 60°F before pressure testing small diameter pipes. Larger diameter pipes and cold weather installations require longer cure times. Full cure strength develops over 24 hours providing maximum joint integrity. Never rush cure times as premature testing damages joints.
High filter pressure results from filter media loading with debris, restricted return lines, partially closed valves, or undersized plumbing. Backwash sand filters or clean cartridge filters when pressure rises 8 to 10 PSI above clean baseline. Verify all valves are fully open and return lines are unobstructed.
Never install heaters before the pump as negative pressure causes heater damage. Heaters operate under positive pressure after pump and filter. Proper sequence is pump, filter, heater, then return to pool. Incorrect sequencing causes equipment damage and poor performance.
Proper plumbing sizing maintains flow velocity between 4 to 8 feet per second avoiding excessive friction loss. Undersized piping restricts flow reducing system efficiency. Calculate pipe size based on desired flow rate and available pump pressure. Most residential pools use 1.5 to 2 inch suction lines and 1.5 inch return lines.
Monitor new equipment closely during first weeks of operation checking for leaks, unusual noises, or performance issues. Clean filter baskets weekly and maintain proper water chemistry. Check all electrical connections remain tight and plumbing supports remain secure. Establishing good maintenance habits from the start ensures long equipment life.
Proper pool equipment installation forms the foundation of reliable, efficient pool operation that provides years of trouble free service and enjoyment. Following manufacturer specifications, building codes, and industry best practices ensures your investment performs optimally while avoiding costly repairs and premature equipment failure. Each installation step from planning layout to testing operation contributes to overall system success.
Taking time to understand equipment requirements, selecting quality components from reputable suppliers, and executing installation carefully pays dividends through lower operating expenses, reduced maintenance demands, and enhanced system performance. Whether tackling installation yourself or working with professionals, this guide provides the knowledge needed for successful pool equipment installation that meets your needs and exceeds your expectations.
Start your pool equipment installation project with confidence knowing you have comprehensive guidance covering every critical aspect from initial planning through final testing and ongoing maintenance.
Ready to install or upgrade your pool equipment?
Contact Dave Pools today for expert guidance on selecting the right pumps, filters, heaters, and installation materials for your pool. Our team helps you choose compatible, high-quality materials and provides product support to ensure efficient, trouble-free pool operation for years to come.