How to Bend PVC Pipe — Methods & Techniques

Professional technique for bending PVC pipe using heat gun showing proper hand position and curved result

Introduction

Struggling to navigate tight corners or create custom pipe configurations? Rigid PVC fittings force you into standard angles, waste materials, and create weak points with multiple joints. Without knowing proper bending techniques, you’ll crack expensive pipes, create kinks that restrict flow, or compromise structural integrity. This expert guide reveals five professional PVC pipe bending methods that deliver smooth, durable curves for any project.

Why Bend PVC Pipe Instead of Using Fittings

Bending PVC pipes offers significant advantages over traditional fitting assemblies in many applications. Understanding when to bend versus when to use fittings helps optimize your plumbing and construction projects.

Advantages of Bending Over Fittings

Fewer Leak Points: Every fitting joint represents a potential failure point. Bent pipes eliminate unnecessary connections, reducing leak risks by up to 60% in complex installations. A single smooth bend replaces two elbows and a coupling, removing three potential leak sources.

Smoother Flow Characteristics: Sharp elbow fittings create turbulence and reduce flow efficiency. Gradual bends maintain laminar flow, reducing pressure drops and improving system performance. This becomes critical in high-flow applications like pool circulation or irrigation systems.

Cost Savings: Quality PVC fittings add up quickly. A simple 90-degree configuration using two elbows costs more than heating and bending a single pipe section. Large projects save hundreds of dollars through strategic bending.

Cleaner Aesthetics: Bent pipes create sleek, professional-looking installations without the bulky appearance of multiple fittings. This matters in visible applications like exposed plumbing or artistic projects.

Custom Angles: Standard fittings come in fixed angles—typically 22.5°, 45°, and 90°. Bending allows any angle between 0° and 90°, perfect for navigating irregular spaces or matching existing structures.

When to Choose Fittings Instead

Despite bending advantages, fittings remain the better choice for:

  • Sharp 90-degree turns requiring minimal space
  • Connections between different pipe diameters
  • Branch connections using tees or wyes
  • Situations requiring future disassembly
  • Load-bearing applications where bent pipes might weaken

Understanding how to glue PVC pipe properly becomes essential when fittings are necessary for your project.

Understanding PVC Pipe Properties

Successful PVC bending requires understanding the material’s thermal and physical properties. PVC (Polyvinyl Chloride) behaves predictably when heated, but different schedules and formulations respond differently.

PVC Thermal Characteristics

Glass Transition Temperature: PVC becomes pliable at approximately 176°F (80°C). Below this temperature, the material remains rigid. Above it, PVC softens progressively until reaching full plasticity around 212-250°F (100-121°C).

Melting Point: Pure PVC doesn’t have a sharp melting point but degrades around 500°F (260°C). Overheating releases toxic chlorine gas and permanently damages the pipe structure.

Thermal Expansion: PVC expands approximately 0.00034 inches per inch per degree Fahrenheit. This expansion must be considered when heating pipes, as rapid temperature changes cause stress.

Schedule Ratings and Bendability

Different PVC pipe schedules affect bending difficulty:

Schedule 40: The most common and easiest to bend. Thinner walls heat faster and require less force for shaping. Ideal for residential applications and DIY projects.

Schedule 80: Thicker walls resist bending and require higher temperatures or longer heating times. Better for applications requiring extra strength after bending.

Comparison of Schedule 40 and Schedule 80 PVC pipe showing wall thickness differences and bendability characteristics

Diameter Considerations

Pipe diameter significantly impacts bending difficulty:

  • 1/2″ to 1″ pipes: Easiest to bend, require minimal heating time
  • 1.5″ to 2″ pipes: Moderate difficulty, need even heating
  • 3″ to 4″ pipes: Challenging, require patience and specialized techniques
  • 6″ and larger: Professional equipment recommended

Smaller diameter pipes bend more easily but also kink more readily without proper technique.

Safety Precautions for Bending PVC

PVC bending involves high temperatures and potential hazards. Proper safety measures prevent injuries and property damage.

Essential Safety Equipment

Heat-Resistant Gloves: Never handle heated PVC with bare hands. Quality welding gloves or heat-resistant work gloves rated to at least 400°F protect against burns.

Safety Glasses: Heated PVC occasionally releases moisture or contaminants that can splatter. Eye protection is mandatory.

Respiratory Protection: When heating PVC above 350°F, wear an N95 mask or respirator. Overheated PVC releases hydrogen chloride gas, which is harmful when inhaled.

Ventilation: Always work in well-ventilated areas. Open windows, use fans, or work outdoors when possible. Never heat PVC in enclosed spaces without proper ventilation.

Workspace Safety

Fire Prevention:

  • Keep fire extinguisher nearby
  • Clear workspace of flammable materials
  • Use heat-resistant work surface
  • Never leave heat sources unattended
  • Keep water source accessible for emergencies

Environmental Considerations:

  • Protect surrounding surfaces from heat damage
  • Use heat shields when working near walls
  • Avoid heating PVC near electrical components
  • Keep children and pets away from work area

Temperature Monitoring

Use an infrared thermometer to monitor pipe temperature. Optimal bending temperature ranges from 200-250°F. Temperatures exceeding 350°F risk material degradation and toxic fume release.

Method 1: Heat Gun Bending Technique

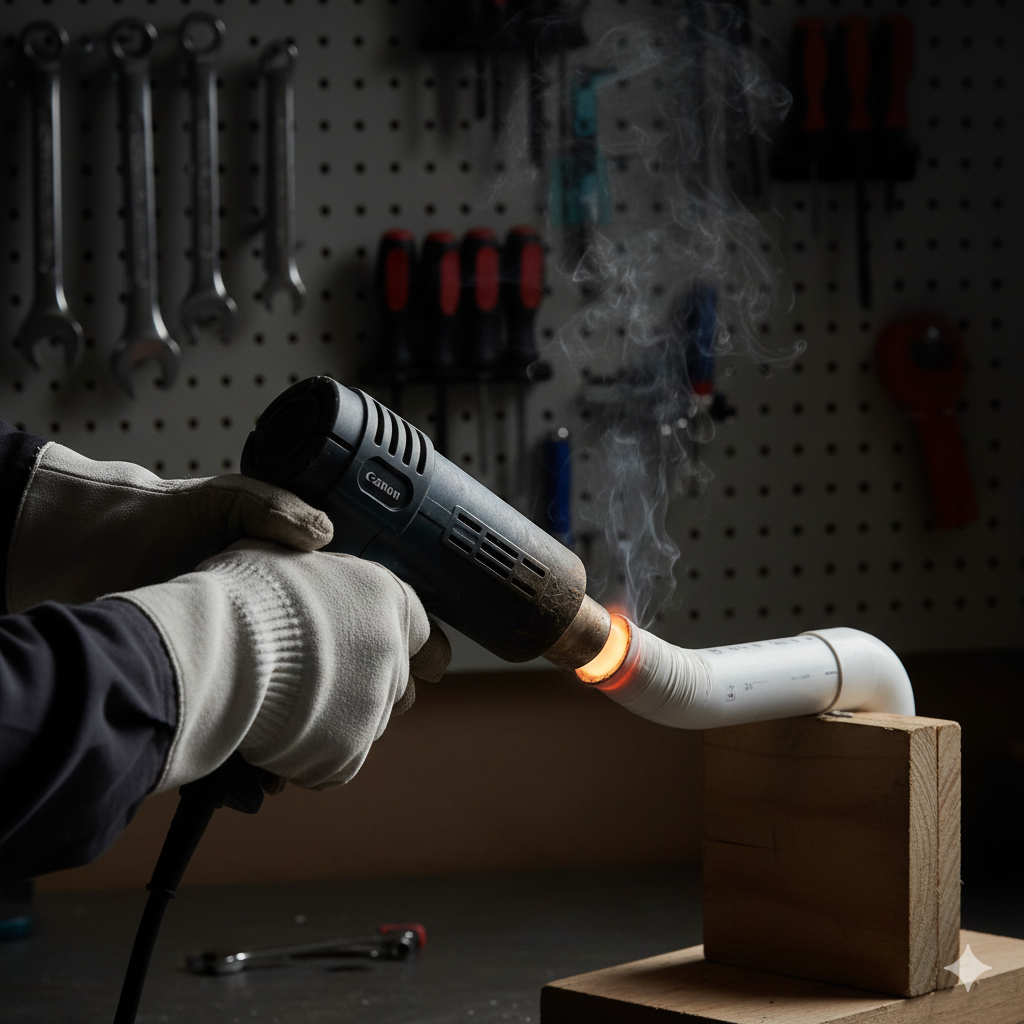
The heat gun method offers the most control and precision for PVC bending. Professional plumbers prefer this technique for its consistency and versatility.

Required Equipment

  • Industrial heat gun (1,500+ watts recommended)
  • Heat-resistant gloves
  • Wooden bending jig or template
  • C-clamps or vise
  • Infrared thermometer
  • Safety glasses
  • Marking pencil

Step-by-Step Heat Gun Process

Preparation Phase:

  1. Measure and mark the bending area on your pipe. Mark the center point and extent of the bend on all sides for reference.
  2. Create or select a bending template. Use scrap wood, metal pipe, or commercial bending jigs to achieve your desired radius. The template diameter should match your target curve.
  3. Secure your workspace. Clamp the template firmly to a heat-resistant work surface. Position the pipe so the marked section aligns with the bending form.
Complete heat gun bending setup showing all required tools and proper workspace organization for PVC pipe bending

Heating Process:

  1. Set heat gun temperature to medium-high (approximately 600-750°F at the nozzle). The pipe surface temperature should reach 200-250°F.
  2. Begin heating the marked section, holding the heat gun 2-3 inches from the pipe surface. Move the heat gun continuously in a back-and-forth motion to distribute heat evenly.
  3. Rotate the pipe slowly while heating to ensure even temperature distribution around the entire circumference. Uneven heating causes weak spots and irregular bends.
  4. Monitor temperature constantly with your infrared thermometer. When the pipe surface reaches 220-240°F, it becomes pliable.
  5. Test flexibility gently by applying slight pressure. When the pipe bends easily without resistance, it’s ready for forming.

Bending Execution:

  1. Apply steady, even pressure to bend the pipe against your template. Work slowly—rushing creates kinks or uneven curves.
  2. Maintain pressure while the pipe cools slightly. The PVC should hold its shape after 15-20 seconds of cooling.
  3. Continue heating and bending in small increments if creating a complex or long curve. Multiple gentle bends produce better results than one aggressive bend.
  4. Hold the final position for 30-60 seconds while applying cooling air from a fan or allowing natural air cooling.

Cooling and Finishing:

  1. Keep the pipe in the jig for at least 5 minutes of initial cooling. Premature release causes the pipe to spring back partially.
  2. Apply cool water gently after initial air cooling for faster temperature reduction. Never plunge hot PVC into cold water—thermal shock causes cracking.
  3. Inspect the bend for kinks, flat spots, or irregularities. A perfect bend maintains consistent diameter throughout the curve.

Heat Gun Method Advantages

  • Precise temperature control
  • Works for all pipe sizes
  • Creates professional-quality bends
  • Allows complex multi-angle bends
  • Minimal equipment investment

Limitations

  • Requires practice for consistency
  • Time-consuming for multiple bends
  • Needs electrical power source
  • Higher initial learning curve

Method 2: Hot Water Bath Method

The hot water bath method provides uniform heating for simpler bends, making it ideal for beginners or when working with smaller diameter pipes.

Required Equipment

  • Large pot or container (longer than bend section)
  • Heat source (stove, hot plate, or propane burner)
  • Thermometer (candy or meat thermometer)
  • Tongs or heat-resistant gloves
  • Bending jig or form
  • Pipe caps or plugs

Hot Water Bending Process

Setup Phase:

  1. Fill your container with enough water to completely submerge the section you’re bending. The water level should cover the pipe by at least 2 inches.
  2. Heat water to 200-212°F (near boiling). Use a thermometer to verify temperature—water that’s too hot can warp the pipe unevenly.
  3. Prepare your bending form and position it near the water source for quick transfer.
  4. Cap both pipe ends to prevent water from entering. Water inside the pipe creates uneven heating and weight issues.

Heating Process:

  1. Submerge the marked section in hot water. Use tongs or a dowel to position the pipe underwater.
  2. Maintain water temperature at 200-212°F throughout the heating process. Add heat as needed to compensate for temperature drop.
  3. Heat for appropriate duration based on pipe size:
    • 1/2″ pipe: 2-3 minutes
    • 3/4″ to 1″ pipe: 3-4 minutes
    • 1.5″ to 2″ pipe: 5-7 minutes
    • 3″ pipe: 8-10 minutes
  4. Test flexibility by removing the pipe briefly and applying gentle pressure with gloved hands.

Bending Execution:

  1. Remove the heated section quickly using tongs or gloved hands. Time is critical—PVC begins cooling immediately.
  2. Position against your bending form and apply steady, even pressure. Work confidently but not hastily.
  3. Hold the bend firmly for 30-45 seconds while the outer surface cools slightly and sets the shape.
  4. Maintain position in the jig for 2-3 minutes of initial cooling before releasing.

Advantages of Hot Water Method:

  • Uniform heating around entire pipe
  • Lower risk of overheating
  • Minimal equipment cost
  • Excellent for beginners
  • No specialized tools required
  • Consistent results for simple bends

Limitations:

  • Limited to relatively short bend sections
  • Requires large water container for big pipes
  • Less precise angle control
  • Messy workspace
  • Not ideal for complex multi-bend configurations

Method 3: Sand-Filled Bending Method

The sand-filled technique prevents pipe collapse during bending, producing perfectly round curves without flattening or kinking. This method works exceptionally well for larger diameter pipes.

Required Equipment

  • Clean, dry sand (playground sand works well)
  • Pipe caps or wooden plugs for both ends
  • Heat gun or propane torch
  • Bending jig or template
  • Funnel for sand filling
  • Heat-resistant gloves
  • Safety glasses

Sand-Filling Process

Preparation:

  1. Select completely dry sand. Moisture in sand creates steam when heated, potentially causing pipe burst or uneven heating.
  2. Cap one end of the pipe section securely. Use a proper PVC cap or create a tight wooden plug.
  3. Fill the pipe completely with sand using a funnel. Tap the pipe gently against a hard surface to settle the sand and eliminate air pockets.
  4. Fill until completely packed. The sand should be firmly compacted throughout the entire length.
  5. Cap the second end securely to prevent sand spillage during heating and bending.
Three-step sand-filling process for PVC pipe bending showing filling, capping, and heating stages

Heating and Bending:

  1. Heat the sand-filled section using a heat gun or carefully with a propane torch. Move the heat source continuously to prevent hot spots.
  2. Heat time increases significantly due to sand’s thermal mass. Allow 50-100% more heating time compared to empty pipes.
  3. Test flexibility carefully. The pipe should bend smoothly without collapsing or creating flat spots.
  4. Form the bend against your template while maintaining steady pressure. The sand provides internal support, preventing collapse.
  5. Hold the position until the pipe cools enough to maintain shape (approximately 1-2 minutes).

Sand Removal:

  1. Allow complete cooling before removing sand. Hot sand can burn and is difficult to handle.
  2. Remove end caps and pour out sand. You may need to tap the pipe to dislodge compacted sand.
  3. Flush with water if needed to remove all sand particles, especially for water supply applications.

Sand Method Advantages

  • Prevents pipe collapse on tight radius bends
  • Excellent for larger diameter pipes
  • Creates perfectly round bends
  • Reduces kinking risk dramatically
  • Reusable materials (sand can be dried and reused)

Sand Method Limitations

  • More preparation time required
  • Heavier to handle during bending
  • Sand removal can be messy
  • Requires extra heating time
  • Not practical for quick, simple bends

Method 4: Oven Heating Method

The oven method provides controlled, even heating for multiple pipes or complex bending projects requiring consistency.

Required Equipment

  • Kitchen oven or toaster oven (dedicated, not for food use)
  • Oven thermometer for accuracy
  • Heat-resistant baking sheet
  • Bending jig or form
  • Heat-resistant gloves
  • Timer

Oven Bending Process

Safety Warning: Never use a food-preparation oven for PVC heating. Dedicate a separate appliance or use an industrial oven. PVC releases chemicals when heated that contaminate surfaces.

Setup:

  1. Preheat oven to 225-250°F. Use an oven thermometer to verify accuracy—built-in oven thermostats are often inaccurate.
  2. Place pipes on heat-resistant baking sheet, positioning the sections to be bent toward the center for even heat distribution.
  3. Insert thermometer near the pipes to monitor actual temperature at pipe level.

Heating Process:

  1. Heat pipes for predetermined time based on diameter:
    • 1/2″ to 3/4″: 8-10 minutes
    • 1″ to 1.5″: 12-15 minutes
    • 2″: 15-20 minutes
  2. Monitor temperature carefully. Never exceed 300°F—higher temperatures risk degradation.
  3. Test one pipe first before heating multiple pipes. Remove and check flexibility.

Bending:

  1. Remove heated pipe with gloves and quickly position against bending form.
  2. Apply steady pressure until desired angle is achieved.
  3. Hold for 45-60 seconds while maintaining pressure.
  4. Allow to cool in position for 3-5 minutes before handling.

Oven Method Advantages

  • Batch processing capability
  • Consistent, even heating
  • Hands-free heating process
  • Repeatable results for multiple identical bends
  • Controlled temperature environment

Oven Method Limitations

  • Requires dedicated oven
  • Limited by oven size
  • Slower than heat gun for single pipes
  • Less portable
  • Temperature monitoring essential

Method 5: Hair Dryer Method for Small Pipes

The hair dryer method suits small-diameter pipes (1/2″ to 1″) and minor bends where high temperatures aren’t necessary.

Required Equipment

  • High-wattage hair dryer (1,800+ watts)
  • Heat-resistant gloves
  • Simple bending template
  • Patience (this method is slow)

Hair Dryer Process

Setup and Heating:

  1. Position pipe against template before heating, determining exact bending point.
  2. Set hair dryer to maximum heat and hold 1-2 inches from pipe surface.
  3. Move dryer constantly in circular or back-and-forth motion around the pipe circumference.
  4. Heat for extended period: Small pipes require 5-10 minutes of continuous heating.
Hair dryer method for bending small diameter PVC pipe showing proper heating technique and hand positioning

Bending:

  1. Test flexibility frequently as PVC heats gradually with lower temperature heat sources.
  2. Apply gentle pressure when pipe becomes pliable. Hair dryers provide less heat, requiring more gradual bending.
  3. Continue heating while bending if needed, maintaining steady pressure.
  4. Hold position for 60-90 seconds as cooling takes longer with this method.

Hair Dryer Advantages

  • Accessible household tool
  • Safe for beginners
  • Low risk of overheating
  • Minimal investment
  • Quiet operation

Hair Dryer Limitations

  • Only suitable for small diameter pipes
  • Very time-consuming
  • Limited to gentle bends
  • Inconsistent results on Schedule 80
  • Not practical for professional work

Common Bending Mistakes to Avoid

Understanding common errors helps you achieve professional results on your first attempt.

Overheating the Pipe

Problem: Heating PVC beyond 350°F causes material degradation, discoloration, and structural weakness. Overheated PVC turns brown or yellow and becomes brittle.

Solution: Use an infrared thermometer to monitor temperature constantly. Maintain working temperature between 200-250°F. Move heat sources continuously to prevent hot spots.

Uneven Heating

Problem: Heating only one side creates irregular bends, weak spots, and potential failure points. The heated side compresses while the cool side remains rigid, producing oval cross-sections.

Solution: Rotate pipes continuously during heating. Heat guns should move in consistent patterns around the entire circumference. Water bath methods naturally provide even heating.

Rushing the Process

Problem: Forcing cold or insufficiently heated PVC creates stress fractures, kinks, and permanent damage. Quick bends flatten pipe cross-sections, reducing flow capacity.

Solution: Allow adequate heating time for your pipe size. Test flexibility before applying significant pressure. Work gradually, especially on tight radius bends.

Inadequate Cooling Time

Problem: Removing pipes from jigs too quickly allows partial spring-back, losing your desired angle. Hot PVC lacks structural rigidity.

Solution: Maintain pressure for minimum 30 seconds initial cooling. Keep pipes in jigs for 3-5 minutes before release. Allow complete cooling before subjecting to stress.

Forgetting Internal Support

Problem: Bending large diameter or thin-wall pipes without internal support causes collapse and oval distortion.

Solution: Use the sand-filling method for pipes larger than 2 inches or when creating tight radius bends. Internal support maintains round cross-sections.

Wrong Temperature Selection

Problem: Different PVC pipe types require different heating approaches. CPVC requires higher temperatures than standard PVC. Understanding material differences prevents damage.

Solution: Verify pipe material before beginning. Standard PVC softens at lower temperatures than CPVC. Adjust heating time and temperature accordingly.

Tips for Perfect Bends Every Time

Professional plumbers use these techniques to achieve consistent, high-quality bends.

Create a Bending Template Library

Build reusable templates for common angles and radii:

  • Cut plywood or MDF into curved forms
  • Label each template with radius and maximum pipe size
  • Store organized by application
  • Sand smooth edges to prevent pipe scratching

Templates ensure repeatability across multiple projects and reduce setup time.

Practice on Scrap Pieces

Master techniques risk-free:

  • Use leftover pipe sections for practice
  • Test different heating times for your equipment
  • Develop feel for proper flexibility
  • Identify optimal temperature ranges
  • Build confidence before working on project pieces

Mark Reference Lines

Clear marking improves accuracy:

  • Draw centerline of bend on all sides
  • Mark extent of heating zone
  • Indicate desired final angle
  • Use contrasting marker colors
  • Reference marks remain visible during heating

Work with Gravity When Possible

Position work to use gravity assistance:

  • Hang pipe vertically for downward bends
  • Support weight during horizontal bends
  • Allow gravity to assist in maintaining position during cooling
  • Reduces hand fatigue on large pipes

Control Cooling Rate

Strategic cooling improves results:

  • Air cooling: Slowest, most controlled
  • Fan-assisted: Faster, still controlled
  • Water misting: Quick cooling for setting shape
  • Never use ice water—thermal shock causes cracks

Test Pressure Ratings After Bending

Understanding how to pressure test PVC pipe becomes crucial after bending. Bent sections should maintain original pressure ratings when properly executed.

Post-Bend Testing Protocol:

  1. Allow 24-48 hours after bending before pressure testing
  2. Test at 1.5x working pressure
  3. Inspect bend section carefully during test
  4. Look for stress whitening or deformation
  5. Document test results for critical applications

Maintaining Bent PVC Pipes

Properly bent PVC pipes require minimal maintenance but benefit from periodic inspection.

Regular Inspection Schedule

Visual Checks (Annually):

  • Examine bend sections for cracks or stress marks
  • Look for discoloration indicating UV damage
  • Check for deformation under load
  • Verify secure mounting if applicable

Pressure System Checks:

  • Monitor for pressure drops indicating leaks
  • Listen for unusual sounds at bend points
  • Verify flow rates remain consistent
  • Inspect during seasonal maintenance

UV Protection for Exposed Bends

Outdoor Installation Considerations:

  • Apply UV-resistant paint to exposed sections
  • Consider conduit or pipe insulation cover
  • Inspect outdoor bends more frequently
  • Replace if significant yellowing or brittleness develops

PVC degrades under prolonged UV exposure. Bends experience more stress than straight sections, making protection essential for longevity.

Load Management

Proper Support:

  • Install pipe hangers within 3-4 feet of bends
  • Avoid concentrated loads on bent sections
  • Don’t use bends as structural supports
  • Account for thermal expansion near bends
Properly installed and supported bent PVC pipes showing correct hanger placement near bend sections

Temperature Considerations

Thermal Effects on Bent Pipes:

  • Bent sections expand more than straight runs
  • Allow for expansion joints in long bent runs
  • Consider seasonal temperature variations
  • Monitor outdoor installations in extreme climates

When to Replace Bent Sections

Replacement Indicators:

  • Visible cracks or crazing
  • Significant discoloration
  • Deformation under normal pressure
  • Stress whitening around bend
  • Age exceeding 20 years in high-stress applications

Learn how to cut PVC pipe properly when replacement becomes necessary.

Frequently Asked Questions

Can all types of PVC pipe be bent?

Yes, most PVC formulations can be bent with proper heating techniques. Standard Schedule 40 and Schedule 80 PVC bend successfully at 200-250°F. However, some specialty PVC formulations like cellular core or foam core pipes don’t bend well due to internal structure. CPVC requires higher temperatures (around 280°F) than standard PVC. Always verify your specific pipe material before attempting to bend.

What’s the minimum bend radius for PVC pipe?

Minimum bend radius depends on pipe diameter and wall thickness. A general rule suggests minimum radius of 3-4 times the pipe’s outside diameter for Schedule 40, and 4-5 times for Schedule 80. For example, a 2-inch Schedule 40 pipe (2.375″ OD) should maintain a minimum 7-10 inch radius. Tighter bends risk kinking, flattening, or creating stress points that fail under pressure.

Does bending PVC pipe reduce its pressure rating?

Properly executed bends maintain approximately 90-95% of the original pressure rating when the radius exceeds minimum recommendations and the pipe doesn’t show stress whitening or deformation. Poorly executed bends with flattened cross-sections, kinks, or visible stress marks significantly reduce pressure capacity—sometimes by 50% or more. Always pressure test bent sections before installing in critical applications.

How long does it take for bent PVC to fully cure?

Bent PVC reaches handling strength within 5-10 minutes of cooling to room temperature. However, the molecular structure continues stabilizing for 24-48 hours. For best results, allow bent pipes to rest for at least 24 hours before subjecting them to pressure or stress. Critical applications benefit from 48-72 hours of curing time before pressure testing or installation.

Can I re-bend PVC pipe if I make a mistake?

Yes, PVC can be reheated and rebent multiple times, though each heating cycle slightly degrades the material. Limit reheating to 2-3 times maximum on the same section. Each bend-reheat cycle increases brittleness and reduces long-term durability. If possible, cut out poorly bent sections and start with fresh pipe for critical applications requiring maximum strength and longevity.

What temperature is too hot for bending PVC?

Temperatures exceeding 350°F cause irreversible damage to PVC structure. At 400°F and above, PVC begins releasing toxic chlorine gas and degrading rapidly. Optimal bending temperature ranges from 200-250°F for standard PVC. Use infrared thermometers to monitor temperature precisely. Discoloration (yellowing or browning) indicates overheating—discard overheated sections as they’ve lost structural integrity.

Do I need to seal bent PVC pipes differently?

No special sealing is required for bent PVC sections. Standard PVC primer and cement work identically on bent and straight sections when following proper gluing techniques. Ensure surfaces are clean, apply primer thoroughly, and use appropriate cement for your pipe schedule. The bending process doesn’t affect the chemical bonding process used in PVC connections

How do I prevent kinking when bending small diameter pipes?

Kinking prevention requires three key techniques: gradual heating with constant rotation ensures even temperature distribution, filling pipes with dry sand provides internal support preventing collapse, and using larger radius bends (4-5x pipe diameter) reduces stress concentration. Work slowly, applying gentle pressure as the pipe softens rather than forcing quick bends on insufficiently heated material.

Can bent PVC pipes be used for pressurized water systems?

Absolutely. Properly bent PVC pipes perform excellently in pressurized water systems when executed correctly. The bend must maintain round cross-section without flattening, show no stress whitening or discoloration, use adequate bend radius (3-4x pipe diameter minimum), and pass pressure testing at 1.5x working pressure. Many professional installations use bent PVC successfully in irrigation, pool plumbing, and water distribution systems.

What’s the best method for bending large diameter PVC pipes?

For pipes 3 inches and larger, the sand-filling method combined with heat gun application produces best results. Fill pipe completely with dry sand to prevent collapse, heat gradually while rotating continuously, use commercial or custom-made forming jigs for consistent radius, and allow extended heating time (proportional to wall thickness and diameter). Large pipes require patience—rushing large diameter bends almost always produces poor results with flattening or irregular curves.

How do I know when PVC pipe is hot enough to bend?

Properly heated PVC exhibits specific signs: surface temperature reads 220-250°F on infrared thermometer, pipe feels uniformly warm when touched with gloved hand, gentle pressure causes the pipe to flex smoothly without resistance, and the pipe maintains slight flexibility without being overly soft. If the pipe feels rigid, continue heating. If it becomes too soft and loses shape, reduce temperature slightly.

Will bending PVC void manufacturer warranties?

Most PVC pipe manufacturers design their products for potential bending applications and don’t automatically void warranties. However, warranties typically exclude damage from improper installation techniques including overheating, excessive stress, or inappropriate applications. Document your bending process with temperature logs and pressure tests for critical installations. For commercial projects, consult manufacturer specifications or contact technical support before bending.

Conclusion

Mastering PVC pipe bending opens new possibilities for custom plumbing, irrigation, and construction projects. This comprehensive guide has equipped you with five proven methods—from beginner-friendly hot water techniques to professional heat gun applications.

Remember that successful PVC bending requires patience, proper temperature control, and attention to detail. Whether you choose the precision of heat gun bending, the simplicity of hot water methods, or the kink-prevention benefits of sand-filling, each technique delivers professional results when executed correctly.

Ready to start your PVC pipe bending project? Visit Dave Pools for quality Schedule 40 and Schedule 80 PVC pipes, professional fittings, heat-resistant tools, and expert guidance. Our comprehensive selection and technical support ensure you have everything needed to achieve perfect bends with professional results that last for decades.

Related articles