Installing PVC pipes underground might seem daunting, but thousands of DIY enthusiasts damage their property annually by skipping crucial steps. Without proper installation techniques, you risk costly repairs, water damage, and complete system failure within months. This comprehensive guide walks you through professional underground PVC installation methods that ensure decades of reliable performance.
Underground PVC pipe installation serves critical functions in residential and commercial properties, from water supply lines to drainage systems. The process demands precision because buried pipes aren’t easily accessible for repairs.
Schedule 40 PVC remains the industry standard for underground installations due to its exceptional durability and chemical resistance. Unlike metal alternatives, PVC withstands soil acidity, resists corrosion, and maintains structural integrity for 50+ years when properly installed.

Before starting your project, familiarize yourself with PVC pipe fundamentals to understand material properties and applications. This knowledge prevents costly material selection errors.
Quality materials make the difference between a 5-year failure and a 50-year system. Never compromise on pipe grade or cement quality.
Contact 811 or your local utility locator service at least 2-3 business days before excavation. Underground utilities including gas, electric, water, and communications lines pose serious safety hazards. Penalties for damaging utilities can reach thousands of dollars.

Burial depth varies by application and climate:
Check local building codes for specific depth requirements. Frost lines in northern climates may require depths of 36-48 inches to prevent freeze damage.
Map your installation route considering:
Mark your planned route with spray paint or stakes. This visualization helps identify potential problems before digging begins.
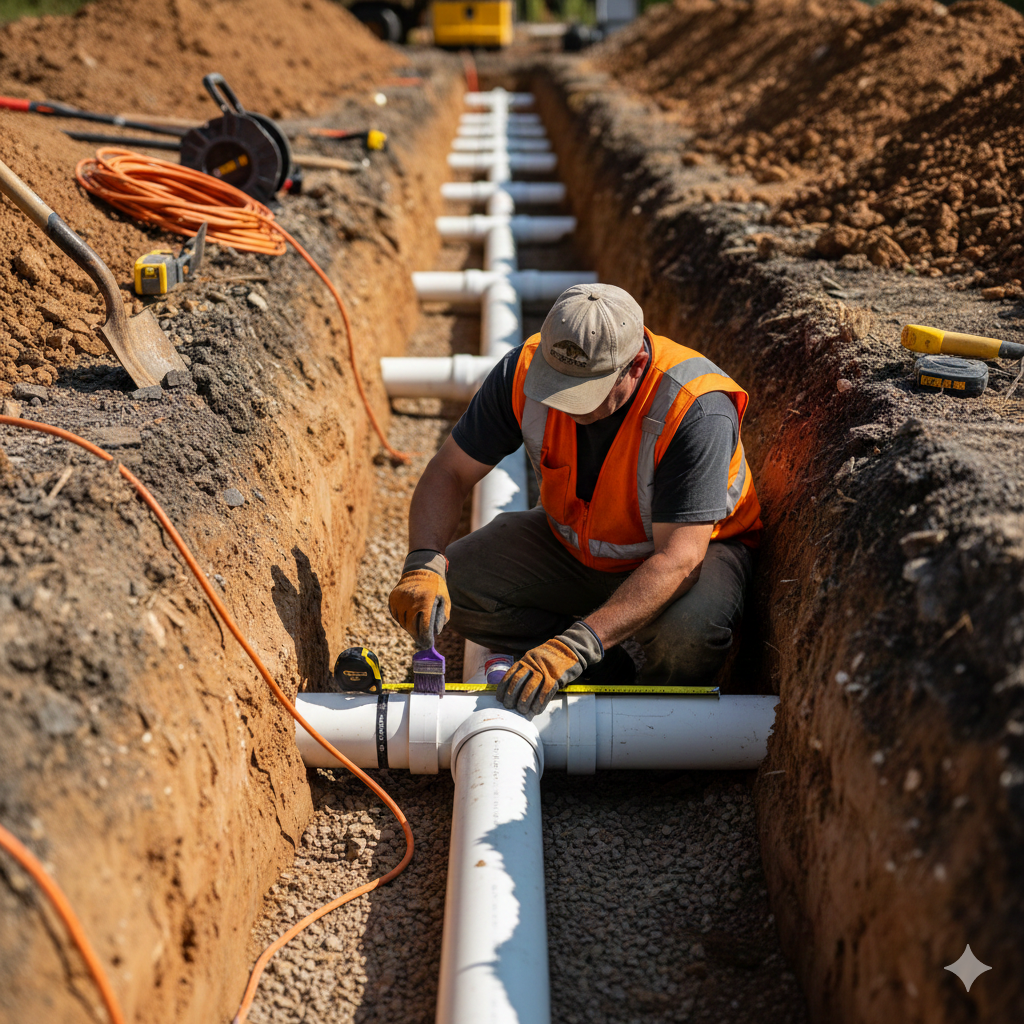
Start with clean, straight trenches. Width should accommodate the pipe diameter plus 6 inches on each side for proper backfill. For example, a 2-inch pipe requires a 14-inch wide trench.
Trench Width Formula: Pipe outside diameter + 12 inches = minimum trench width
Excavate to the planned depth plus 4-6 inches for bedding material. Keep excavated soil separate from topsoil for proper layering during backfill.
Use a string line stretched along the trench to maintain straightness. Check slope regularly with a level, especially for drainage applications.
The trench bottom provides critical pipe support. Remove all rocks, roots, and debris that could damage pipes or create stress points.
Create a uniform bedding layer:
This bedding cushions the pipe and distributes weight evenly. Never place pipes directly on hard, rocky soil.
Accurate cutting ensures proper joints. Measure twice, cut once prevents material waste.

Follow the techniques detailed in our guide on how to cut PVC pipe for professional results:
After cutting, remove burrs and rough edges with a deburring tool. Burrs create weak points in cemented joints and restrict water flow.
Before applying any cement, assemble the entire system dry. This critical step reveals:
Insert pipes into fittings to the shoulder (approximately 1/3 to 1/2 the fitting depth). Mark insertion depth with a pencil for reference during final assembly.
Test fit in the trench to verify:
Proper cementing creates permanent, leak-proof connections. Our detailed guide to gluing PVC pipe covers advanced techniques, but here’s the essential process:
Priming (Purple Primer Recommended)
Cementing
Cure Times (70°F ambient temperature):
Temperature affects cure rates. Add time in cold weather, reduce in hot conditions.

Handle cemented assemblies carefully during the critical cure period. Disturbing fresh joints causes micro-fractures that lead to eventual failure.
For long runs:
Lay pipes on the prepared bedding, ensuring full contact along the entire length. Gaps or high spots create stress concentration points.
Underground installations often require multiple pipe sections. Connect these sections using:
Coupling Method:
Junction Method:
Ensure all connections maintain system alignment and slope requirements.
Backfilling protects pipes while allowing proper soil consolidation. Improper backfilling causes the majority of underground pipe failures.
First Layer – Initial Bedding (6 inches):
Second Layer – Intermediate Fill (6-12 inches):
Warning Tape Installation: Many jurisdictions require detectable warning tape 12 inches below finished grade. Install tape directly over backfilled area with printed message facing up.
Third Layer – Final Fill:
Compaction Guidelines:
Never use heavy equipment directly over pipes. Soil provides minimal protection until proper compaction occurs.
Professional testing confirms system integrity before covering permanently. The investment in proper testing prevents catastrophic failures.
Follow detailed procedures in our PVC pipe pressure testing guide:
Standard Test Parameters:
Acceptable pressure loss: Less than 5 PSI over test period.

Before backfilling, conduct thorough visual inspection:
Document the installation with photographs for future reference.
Drainage systems require flow testing:
Proper slope (minimum 1/4 inch per foot) ensures gravity drainage functions correctly.
Schedule 40 PVC suits most underground applications, but some situations require Schedule 80’s extra wall thickness. Using thinner schedule pipes in high-pressure or high-traffic areas leads to failures.
Shallow installations suffer from:
Always meet or exceed minimum code requirements for burial depth.
The leading cause of leak failures stems from improper joint preparation:
Every joint matters equally – no shortcuts.
PVC cement requires full cure time before pressurization. Rushing creates weak joints prone to failure. Temperature affects cure rates significantly:
PVC expands and contracts with temperature changes. Long straight runs without expansion accommodation develop stress:
Using large rocks, construction debris, or clay backfill damages pipes through point loading and prevents proper consolidation. Always use appropriate bedding and backfill materials specified in local codes.
Underground PVC pipes require minimal maintenance when properly installed, but periodic checks ensure longevity:
Visual Surface Checks:
Performance Monitoring:
Tree roots cause significant underground pipe damage:
Understanding how to find broken pipes underground helps diagnose problems before they worsen.
In freeze-prone areas:
Maintain detailed installation records:
These records prove invaluable for future repairs, additions, or property transfers.
Pipe quality directly impacts system longevity. Our guide on choosing PVC pipe manufacturers helps identify reliable suppliers who meet industry standards.
Look for:
Different pipe materials suit different applications. Learn about thermoplastic polymers in plastic pipes to understand why PVC performs well underground.
PVC advantages for underground installation:
Underground drainage requires special considerations covered in our comprehensive guide on types of drainage pipes. Drainage pipes must:
Yes, but with precautions. Work during warmest part of day, protect materials from freezing, and double cement cure times in temperatures below 40°F. Never cement frozen pipes – thaw completely first. Store cement and primer in warm location between use. Consider postponing installation if temperatures remain below 32°F.
Minimum 18 inches in temperate climates, but local frost lines dictate actual depth. Cold climate regions require 36-48 inches to prevent freeze damage. Contact local building department for specific requirements. Add 6 inches to code minimum for safety margin
Absolutely. Primer softens PVC surface, removes contaminants, and allows deeper cement penetration. Purple primer provides visual confirmation of application. Skipping primer reduces joint strength by 50% or more and voids most manufacturer warranties. The small cost of primer prevents expensive failures
Minimum 1/4 inch per foot (2% grade) for most drainage applications. Faster slopes work but may cause erosion or excessive velocity. Slower slopes risk sediment accumulation and clogging. Use minimum 1/2 inch per foot for pipes under 4 inches diameter. Verify slope continuously during installation.
Properly installed Schedule 40 PVC pipes last 50-100 years in underground applications. Factors affecting lifespan include installation quality, soil conditions, chemical exposure, and mechanical stress. PVC doesn’t corrode like metal pipes, maintaining structural integrity throughout its service life.
Limited options exist for no-dig repairs. Epoxy pipe lining works for some applications but requires professional equipment. Most repairs require excavation to access damaged sections. Prevention through quality installation eliminates most repair needs. For significant damage, excavation and replacement provide most reliable solution.
Clean, washed sand provides ideal bedding and initial backfill. Avoid clay, large rocks, or debris. Screened fill (maximum 3/4 inch particles) works for intermediate layers. Native soil suffices for final fill above 24 inches. Each backfill layer serves specific purpose in protecting and supporting pipes.
Schedule 40 handles most residential and light commercial underground applications. Schedule 80’s thicker walls suit high-pressure systems, heavy traffic areas, or situations requiring extra strength. Check local codes for requirements. Schedule 80 costs more but provides additional safety margin in demanding conditions.
Maintain 10-foot minimum clearance from aggressive root systems like willows, poplars, and maples. Install physical root barriers during construction. Use solid-wall pipes rather than perforated in root-prone areas. Consider regular root treatment products for critical lines. Monitor known problem trees annually.
Limited options exist for no-dig repairs. Epoxy pipe lining works for some applications but requires professional equipment. Most repairs require excavation to access damaged sections. Prevention through quality installation eliminates most repair needs. For significant damage, excavation and replacement provide most reliable solution.
Standard Schedule 40 PVC handles temperatures up to 140°F continuously. Cold water lines never approach this limit. Hot water applications may require CPVC instead – our CPVC vs PVC comparison explains differences. Underground thermal insulation rarely necessary except for hot water lines in cold climates.
Excavate carefully to expose existing pipe, ensuring adequate working room. Cut existing pipe cleanly, install coupling or tee fitting as needed, and follow standard cementing procedures. Allow full cure time before backfilling. Consider using repair couplings that don’t require pipe movement for easier installation on existing systems.
Installing PVC pipes underground successfully requires attention to detail, proper planning, and adherence to proven techniques. This comprehensive guide has walked you through every critical phase—from initial planning and utility location to final testing and maintenance.
A properly installed underground PVC system delivers reliable service for 50-100 years with minimal maintenance. Remember that installation quality matters far more than installation speed. Taking extra time to verify measurements, ensure proper joint preparation, and conduct thorough testing prevents costly failures down the line.
Whether you’re installing a simple irrigation line or a complex drainage system, the fundamentals remain the same: proper planning, quality materials, precise execution, and comprehensive testing. While confident DIYers can handle many installations, complex commercial projects, high-pressure applications, or connections to municipal systems may require professional expertise.