How to Fix a Leak in HDPE Pipes: Complete Repair Guide

Professional plumber repairing HDPE pipe leak using heat fusion welding technique with specialized tools

Introduction

HDPE pipe leaks waste thousands of gallons of water annually and cause significant property damage when left unaddressed. Unlike traditional piping materials, HDPE’s unique polyethylene composition requires specialized repair techniques that standard methods can’t handle. This expert guide reveals proven repair strategies that restore HDPE pipe integrity permanently, saving you costly replacement expenses and preventing catastrophic failures.

Understanding HDPE Pipe Leaks

High-Density Polyethylene (HDPE) pipes offer exceptional durability and corrosion resistance, yet leaks still occur due to specific failure mechanisms. Understanding why HDPE pipes leak helps you choose the most effective repair method.

Common Causes of HDPE Pipe Leaks

Installation Errors:

  • Inadequate heat fusion during joint assembly
  • Improper fitting alignment causing stress points
  • Insufficient cooling time after fusion welding
  • Over-tightening mechanical fittings
  • Incorrect pipe handling during installation

Physical Damage:

  • Third-party excavation strikes
  • Ground settlement and shifting
  • Freezing and thawing cycles
  • Rock impingement from poor bedding
  • Heavy equipment traffic over shallow burial

Material Degradation:

  • UV exposure in above-ground installations
  • Chemical exposure beyond compatibility limits
  • Extreme temperature fluctuations
  • Manufacturing defects (rare but possible)
  • Age-related stress cracking (typically after 50+ years)
Close-up view of HDPE pipe leak showing crack detail and water seepage on black polyethylene surface

Why HDPE Leaks Differ from Other Pipe Materials

HDPE’s thermoplastic nature creates unique repair challenges. Unlike rigid materials such as PVC pipes, HDPE remains flexible and responds to temperature changes. Traditional adhesive-based repairs fail because HDPE’s smooth, non-porous surface prevents bonding.

The material’s thermal expansion coefficient means HDPE pipes can expand or contract significantly with temperature changes. A repair method that works in summer may fail in winter without proper technique. Understanding what HDPE pipe is helps you appreciate why specialized approaches are necessary.

Essential Tools and Materials

Diagnostic Equipment

  • Pressure gauge: Monitors system pressure during testing
  • Leak detection fluid: Identifies pinhole leaks
  • Moisture meter: Locates hidden leaks
  • Infrared thermometer: Detects temperature anomalies
  • Ultrasonic leak detector: Professional-grade detection tool
  • Marking paint or chalk: Marks leak locations

Temporary Repair Supplies

  • Pipe repair tape: High-pressure rated silicone or rubber tape
  • Hose clamps: Stainless steel, properly sized
  • Repair clamps: Specifically designed for HDPE
  • Epoxy putty: Two-part polyethylene-compatible formula
  • Rubber gasket material: For cushioning repair clamps
  • Clean rags: For surface preparation

Permanent Repair Tools

For Heat Fusion Repairs:

  • Socket fusion machine: Temperature-controlled heating unit
  • Pipe cutter: Creates square, clean cuts
  • Deburring tool: Removes rough edges
  • Alignment guides: Ensures proper joint alignment
  • Cooling fixtures: Maintains alignment during cooling
  • Heat-resistant gloves: Safety equipment
  • Measuring tape and marker: Accurate positioning

For Mechanical Repairs:

  • Saddle fittings: For branch connections over leaks
  • Compression fittings: Mechanical joining system
  • Electrofusion fittings: Electric heating element fusions
  • Pipe wrenches: For mechanical fitting installation
  • Thread sealant: Compatible with polyethylene

Quality tools ensure reliable repairs. Attempting HDPE repairs without proper equipment often creates larger problems than the original leak.

Detecting HDPE Pipe Leaks

Early leak detection prevents minor issues from becoming major failures. HDPE systems require specific detection approaches.

Visual Inspection Methods

Surface Indicators:

  • Unexplained wet spots or pooling water
  • Soggy ground above buried pipes
  • Vegetation growth differences (greener patches)
  • Soil erosion or sink holes
  • Unusual sounds (hissing or rushing water)

System Performance Signs:

  • Pressure drops without demand changes
  • Pump cycling more frequently
  • Water meter movement with all fixtures closed
  • Reduced flow at fixtures
  • Air in system lines

Pressure Testing Protocol

Pressure testing isolates leak locations systematically:

  1. Isolate the section: Close valves to create test zone
  2. Pressurize to 1.5x working pressure: Use air or water
  3. Monitor for 2 hours: Record pressure changes
  4. Calculate leak rate: Pressure drop indicates severity
  5. Visual inspection during test: Locate active leaks

For detailed pressure testing procedures applicable to all pipe materials, review our guide on how to pressure test PVC pipe, which covers testing fundamentals.

 Pressure testing HDPE pipe system with gauge showing pressure reading during leak detection process

Advanced Detection Techniques

Acoustic Leak Detection: Professional ultrasonic equipment detects the sound frequency produced by water escaping under pressure. This method works excellently for buried HDPE pipes where visual inspection is impossible.

Tracer Gas Method: Injecting non-toxic tracer gas into the system and using detection equipment pinpoints leak locations precisely, even in underground installations.

Thermal Imaging: Infrared cameras detect temperature differences caused by escaping water, particularly effective for hot water systems or in cold environments where warm water creates thermal contrast.

For underground HDPE installations, techniques from our guide on how to find broken pipe underground apply equally well.

Temporary Leak Repair Methods

Temporary repairs provide emergency stopgaps until permanent solutions can be implemented. These methods work for small leaks and low-pressure situations.

Repair Tape Application

High-pressure silicone tape offers quick temporary sealing:

  1. Shut off water and depressurize system
  2. Clean pipe surface thoroughly – Remove dirt, oil, moisture
  3. Dry the area completely – Use clean rags and allow air drying
  4. Stretch tape to 200-300% – Activates adhesive properties
  5. Wrap with 50% overlap – Start 2 inches before leak
  6. Continue 2 inches past leak – Ensure complete coverage
  7. Smooth out air bubbles – Press firmly while wrapping
  8. Allow cure time – Typically 24 hours before pressurizing

Tape Limitations:

  • Temporary solution only (days to weeks)
  • Not rated for high pressures
  • Temperature sensitive
  • Degrades with UV exposure
  • Won’t work on large cracks

Pipe Repair Clamps

Repair clamps provide stronger temporary (or semi-permanent) fixes:

Installation Process:

  1. Select appropriately sized clamp – Match pipe diameter exactly
  2. Position rubber gasket – Center over leak point
  3. Wrap clamp around pipe – Align bolt holes
  4. Tighten bolts gradually – Alternate sides for even pressure
  5. Avoid over-tightening – Can crack HDPE pipe
  6. Test under pressure – Gradually restore system pressure
Installing repair clamp with rubber gasket on HDPE pipe leak for temporary emergency fix

Emergency Epoxy Repairs

Specialized polyethylene-compatible epoxy putty works for pinhole leaks:

  1. Knead equal parts thoroughly – Mix until uniform color
  2. Clean and dry surface – Critical for adhesion
  3. Apply over leak – Press firmly into place
  4. Smooth and shape – Feather edges for seal
  5. Allow full cure – Follow manufacturer time (usually 60 minutes)
  6. Test gradually – Slowly restore pressure

Important Note: Standard epoxies don’t bond to HDPE. Only use products specifically formulated for polyethylene repair.

Permanent Repair Solutions

Permanent HDPE pipe repairs require proper technique and equipment. These methods restore full structural integrity.

Heat Fusion Welding

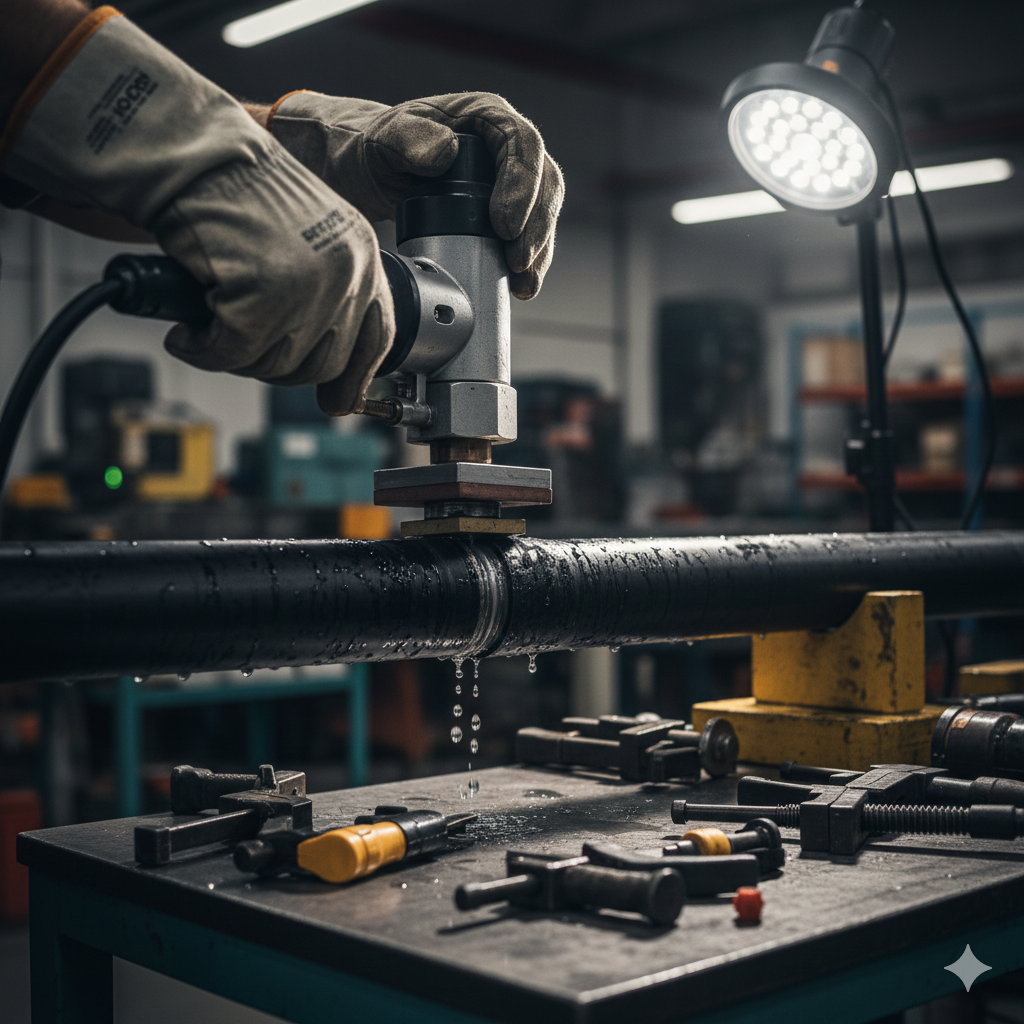
Heat fusion creates molecular bonds between HDPE materials, resulting in joints stronger than the pipe itself. Three primary fusion methods exist:

Butt Fusion:

  • Joins pipe ends directly
  • Requires fusion machine
  • Best for same-diameter pipes
  • Creates seamless connection
  • Industry standard for permanent repairs

Socket Fusion:

  • Uses heated fittings
  • Works for smaller diameter pipes (up to 4 inches)
  • More accessible for field repairs
  • Requires socket fusion tool

Electrofusion:

  • Uses fittings with embedded heating elements
  • Excellent for tight spaces
  • Minimal equipment needed on-site
  • Higher material cost
  • Very reliable results

Heat fusion requires training and proper equipment. While DIY-friendly for small diameter pipes, large installations benefit from professional expertise.

Saddle Fusion Repairs

Saddle fusion adds a fitting directly over the leak point without cutting the pipe:

  1. Mark saddle position – Center over leak
  2. Clean pipe surface – Remove oxidation layer
  3. Heat saddle and pipe simultaneously – Controlled temperature
  4. Press saddle onto pipe – Maintain pressure during cooling
  5. Allow complete cooling – Critical for bond strength
  6. Cap or valve saddle outlet – Seals the repair

This method works excellently for pinhole leaks and small cracks without requiring system shutdown or pipe removal.

Mechanical Coupling Systems

Modern HDPE-compatible mechanical couplings provide reliable repairs without heat:

Advantages:

  • No special heating equipment required
  • Works in wet conditions
  • Allows for some pipe movement
  • Faster installation than fusion
  • Repairable/adjustable after installation

Disadvantages:

  • Higher cost than fusion
  • Requires proper torque specifications
  • Regular inspection recommended
  • Not suitable for all applications
  • Pressure ratings may be lower

Step-by-Step Heat Fusion Repair

Butt fusion repair provides the most reliable permanent solution for HDPE pipe leaks. This detailed process ensures professional results.

Preparation Phase

System Shutdown:

  1. Close isolation valves on both sides of leak
  2. Drain water from repair section
  3. Verify zero pressure with gauge
  4. Mark pipe position and orientation
  5. Photograph installation for reference

Workspace Setup:

  1. Create clean, dry work area
  2. Set up fusion machine on stable surface
  3. Verify heater temperature (typically 400-450°F)
  4. Organize tools within reach
  5. Ensure adequate lighting
Socket fusion welding machine setup for HDPE pipe repair showing temperature controls and pipe alignment

Pipe Preparation

Cutting:

  1. Measure and mark cut lines – Remove damaged section completely
  2. Use pipe cutter for square cuts – Prevents alignment issues
  3. Verify cut is perpendicular – Check with square
  4. Remove burrs with deburring tool – Smooth both inside and outside

Cleaning:

  1. Wipe surfaces with clean cloth
  2. Remove any oxidation layer – Light scraping if necessary
  3. Ensure surfaces are completely dry
  4. Avoid touching prepared surfaces – Use gloves

Fusion Process

Heating Phase:

  1. Insert pipes into heating tool – Equal insertion depth on both sides
  2. Verify proper alignment – Pipes should be perfectly straight
  3. Heat for specified time – Based on pipe diameter (typically 30-60 seconds)
  4. Observe heat indicators – Bead should form at heater interface
  5. Remove from heater quickly – Smooth, controlled motion

Joining Phase:

  1. Align pipe ends immediately – No rotation allowed
  2. Apply steady pressure – Push together firmly
  3. Maintain alignment – Use joining guides or fixtures
  4. Hold for fusion time – Based on diameter (usually 10-30 seconds)
  5. Continue holding during initial cooling – Critical for strength

Cooling Phase:

  1. Keep joint motionless – Any movement weakens bond
  2. Allow cooling per manufacturer specs – Typically 30+ minutes
  3. Inspect fusion bead – Should be uniform around circumference
  4. Verify alignment maintained – Check with straight edge
  5. Document completion time – For cure time tracking

Quality Inspection

Visual Checks:

  • Uniform fusion bead around entire joint
  • No gaps or voids visible
  • Consistent bead height
  • No discoloration indicating overheating
  • Proper alignment maintained

Pressure Testing:

  • Wait minimum cure time (typically 2 hours)
  • Pressurize to 1.5x working pressure
  • Hold for 1 hour minimum
  • Inspect joint under pressure
  • Document test results

Learn more about comprehensive pipe testing in our pressure testing guide.

Mechanical Repair Options

When heat fusion isn’t practical, mechanical repair systems provide reliable alternatives for HDPE pipes.

Compression Fittings Installation

Preparation:

  1. Cut out damaged section – Square, clean cuts
  2. Measure gap precisely – Order correctly sized fitting
  3. Mark insertion depths – Ensures proper seating
  4. Clean pipe ends thoroughly – Remove debris and oxidation

Installation:

  1. Disassemble fitting components – Organize in installation order
  2. Slide compression nuts onto pipes – Correct orientation
  3. Install grab rings – Teeth face toward fitting body
  4. Insert pipes into fitting body – Push to marked depth
  5. Hand-tighten compression nuts – Evenly on both sides
  6. Torque to specifications – Use calibrated wrench
  7. Verify no rotation – Pipes should be secure
Compression fitting assembly for HDPE pipe repair showing components and torque wrench installation

Electrofusion Coupling Repair

Electrofusion combines mechanical ease with fusion strength:

Process:

  1. Scrape pipe oxidation layer – Removes surface contamination
  2. Mark insertion depths – Ensures proper positioning
  3. Insert pipes into coupling – Push to depth marks
  4. Connect fusion controller – Attach electrical leads
  5. Scan barcode or enter parameters – Automated control
  6. Allow automated fusion cycle – Typically 3-10 minutes
  7. Wait for cooling indicator – Green light or timer
  8. Disconnect and inspect – Verify proper fusion

Advantages Over Manual Fusion:

  • Consistent, repeatable results
  • Minimal operator skill required
  • Works in confined spaces
  • Quality controlled by machine
  • Fusion parameters optimized automatically

Saddle Fitting Applications

For non-emergency repairs without system shutdown, saddle fittings excel:

  1. Clean application area – Scrape oxidation thoroughly
  2. Position saddle over leak – Center precisely
  3. Secure with straps – Maintain position during fusion
  4. Heat and fuse – Follow manufacturer procedure
  5. Allow cooling – Maintain pressure during cure
  6. Add valve or cap – Complete the repair

This method effectively seals leaks while maintaining system operation in many cases.

Preventive Maintenance Tips

Preventing HDPE pipe leaks proves far more cost-effective than repairs. Implement these maintenance practices:

Installation Best Practices

Proper Bedding:

  • Use clean sand or fine gravel bedding
  • Ensure uniform support along entire length
  • Avoid sharp rocks contacting pipe
  • Maintain minimum coverage depths
  • Follow techniques from our underground pipe installation guide

Fusion Quality Control:

  • Train operators properly
  • Maintain fusion equipment calibration
  • Follow manufacturer time/temperature specs
  • Document all fusion joints
  • Inspect fusion beads before burial

UV Protection:

  • Cover above-ground installations
  • Use UV-resistant HDPE formulations
  • Paint or wrap exposed sections
  • Minimize exposure time during construction
  • Relocate underground when possible

Regular Inspection Schedule

Monthly Checks:

  • Visual inspection of accessible sections
  • Listen for unusual sounds
  • Monitor pressure gauge readings
  • Check for wet spots or pooling
  • Verify pump operation patterns

Annual Inspections:

  • Comprehensive pressure testing
  • Exposed joint inspections
  • Valve operation verification
  • System performance evaluation
  • Documentation updates

Multi-Year Assessments:

  • Professional leak detection survey (every 5 years)
  • Exposed pipe UV damage assessment
  • Mechanical fitting inspection and re-torque
  • Cathodic protection verification (if applicable)
  • System expansion planning

Monitoring System Performance

Track these indicators to catch leaks early:

Pressure Trends:

  • Unexplained pressure decreases
  • Increased pump run times
  • Pressure fluctuations
  • Recovery time changes

Flow Patterns:

  • Reduced delivery rates
  • Flow inconsistencies
  • Air in system
  • Pump cavitation

Water Usage:

  • Meter reading increases
  • Usage during no-demand periods
  • Unexplained consumption spikes
  • Billing anomalies

Understanding different types of drainage pipes and their maintenance requirements helps you develop comprehensive preventive strategies.

When to Replace vs Repair

Not all HDPE pipe leaks warrant repair. Sometimes replacement provides better long-term value.

Repair Considerations

Good Candidates for Repair:

  • Isolated leak in otherwise sound pipe
  • Recent installation (less than 20 years)
  • Accessible location
  • Quality fusion or mechanical repair possible
  • Cost-effective compared to replacement
  • Minimal disruption to system

Repair Method Selection:

  • Small pinhole: Saddle fusion or repair clamp
  • Crack up to 4 inches: Cut and butt fusion
  • Joint failure: Re-fusion with proper technique
  • Multiple small leaks: Individual repairs if concentrated

Replacement Indicators

Consider Full Replacement When:

  • Multiple leaks throughout section
  • Age exceeds 50 years
  • Extensive UV damage visible
  • System pressure requirements changing
  • Pipe diameter inadequate for demand
  • Access requires significant excavation anyway
  • Repair costs approach replacement costs

Pipe Sizing Considerations: When replacing, verify adequate capacity. Our guide on choosing the best pipe material helps with material selection decisions.

Cost-Benefit Analysis

Repair Costs Include:

  • Materials (fittings, fusion equipment rental)
  • Labor (professional or DIY time)
  • System downtime
  • Testing and verification
  • Future monitoring
  • Potential re-repair

Replacement Costs Include:

  • New pipe and fittings
  • Installation labor
  • Excavation/restoration
  • System modifications
  • Immediate comprehensive solution
  • Extended warranty/lifespan

Calculate total cost of ownership over expected service life. Sometimes higher upfront replacement costs deliver better value than repeated repairs.

Professional Assessment Value

For significant leaks or complex systems, professional evaluation provides:

  • Expert damage assessment
  • Repair feasibility analysis
  • Cost estimates for both options
  • Code compliance verification
  • Quality assurance
  • Warranty protection

Similar to selecting quality PVC pipe manufacturers, choosing qualified HDPE repair professionals ensures reliable outcomes.

Frequently Asked Questions

Can you patch an HDPE pipe leak without replacing it?

Yes, HDPE pipe leaks can be permanently patched using heat fusion techniques like butt fusion, socket fusion, or electrofusion. Saddle fusion allows patching without removing pipe sections. Mechanical methods including compression fittings and repair clamps also work effectively. However, adhesive patches don’t work on HDPE due to the material’s non-porous surface that prevents bonding.

What is the best way to stop an HDPE pipe from leaking?

The best permanent solution is heat fusion repair, which creates molecular bonds as strong as the original pipe. For temporary fixes, use stainless steel repair clamps with rubber gaskets or high-pressure silicone repair tape. Emergency repairs can use polyethylene-compatible epoxy putty. The specific method depends on leak size, location, pressure requirements, and whether a temporary or permanent fix is needed.

Will Flex Seal work on HDPE pipe?

Flex Seal and similar spray-on sealants provide only very temporary fixes for HDPE pipes and aren’t recommended for pressurized systems. HDPE’s smooth, non-porous surface prevents proper adhesion. These products may temporarily slow small leaks but won’t create reliable, long-lasting seals. For dependable repairs, use heat fusion methods or mechanical HDPE-specific repair systems designed for polyethylene materials.

Can you use PVC glue on HDPE pipe?

No, PVC solvent cement absolutely will not work on HDPE pipe. PVC cement works by chemically dissolving and fusing PVC, but HDPE’s different molecular structure is incompatible with these solvents. HDPE requires heat fusion or mechanical joining methods. Attempting to use PVC cement on HDPE wastes time and materials without creating any bond whatsoever.

How do you repair a crack in an HDPE pipe?

Small cracks can be repaired using saddle fusion over the damaged area. Larger cracks require cutting out the damaged section and installing a new piece using butt fusion or electrofusion couplings. For emergency temporary repairs, install a repair clamp with rubber gasket over the crack. The repair method depends on crack length, location, system pressure, and whether permanent or temporary repair is needed.

What causes HDPE pipes to crack?

HDPE pipes crack due to improper installation techniques, physical damage from excavation or ground movement, stress concentration from poor bedding, UV exposure degrading material strength, extreme temperature cycling, and occasionally manufacturing defects. Preventing cracks requires proper installation with adequate bedding, UV protection for exposed sections, appropriate burial depth, and avoiding over-tightening mechanical fittings which creates stress points.

Can HDPE pipe be repaired underground?

Yes, underground HDPE pipes can be repaired by excavating to expose the damaged section. The repair area must be clean and dry for heat fusion. Electrofusion fittings work well in confined excavations. For pipes that can’t be fully excavated, saddle fusion repairs can sometimes be performed. Proper access, cleaning, and drying are critical. Professional equipment may be needed for larger diameter pipes or difficult access situations.

How long does HDPE pipe last?

Properly installed HDPE pipe lasts 50-100 years in underground applications with minimal maintenance. Above-ground installations without UV protection degrade faster, typically 10-25 years depending on sun exposure. Service life depends on installation quality, operating pressure, temperature cycles, chemical exposure, and maintenance practices. HDPE doesn’t corrode like metal pipes, maintaining structural integrity throughout its lifespan when properly installed.

What is the difference between HDPE and PVC pipe repair?

HDPE requires heat fusion or mechanical joining because adhesives don’t bond to polyethylene. PVC uses solvent cement that chemically fuses joints. HDPE is more flexible and tolerates ground movement better. PVC is rigid and may crack under stress that HDPE would flex through. HDPE repairs typically require more specialized equipment and skills compared to PVC’s simpler cementing process.

Is heat fusion repair difficult to learn?

Basic socket fusion for small diameter HDPE pipes can be learned with proper instruction and practice in a few hours. Butt fusion for larger pipes requires more training and experience to achieve consistent quality. Electrofusion is easier to learn due to automated controls. Professional certification programs typically require 1-2 days training. DIYers can successfully perform small repairs with rented equipment and careful attention to manufacturer instructions.

Can you repair HDPE pipe in cold weather?

HDPE pipe repairs are more challenging in cold weather but possible with precautions. Fusion temperatures must be maintained despite cold ambient conditions. Heating tents or tarps may be necessary. Cooling times increase in cold weather. Material becomes less flexible, making handling more difficult. Moisture must be completely removed before fusion. Many professionals postpone non-emergency repairs until temperatures exceed 40°F for optimal results.

What pressure can repaired HDPE pipe handle?

Properly executed heat fusion repairs create joints as strong as the virgin pipe and can handle full rated pressure. Mechanical repairs using compression or electrofusion fittings typically handle 80-100% of pipe rated pressure depending on fitting design. Temporary repairs with clamps and tape should be limited to 50% of rated pressure maximum. Always pressure test repairs before returning to full service.

Conclusion

Fixing HDPE pipe leaks requires understanding the material’s unique properties and applying appropriate repair techniques. Whether you choose temporary solutions like repair clamps for emergency situations or permanent heat fusion repairs for long-term reliability, success depends on proper preparation, quality materials, and correct execution.

Remember that HDPE’s thermoplastic nature makes it fundamentally different from rigid pipe materials. Standard adhesive repairs simply don’t work—you must use heat fusion or mechanical methods specifically designed for polyethylene. While temporary fixes provide short-term relief, investing in proper permanent repairs prevents recurring problems and extends system life.

For small diameter pipes and accessible locations, DIY repairs using socket fusion or mechanical fittings are achievable with the right tools and careful technique. Larger pipes, critical applications, or complex situations benefit from professional expertise to ensure code compliance and reliable results.

Ready to repair your HDPE pipe leak professionally? Visit Dave Pools for quality HDPE pipes, professional-grade fittings, fusion equipment, repair supplies, and expert technical guidance. Our team provides the products and knowledge you need for repairs that last, whether you’re tackling the project yourself or working with professional installers.

Related articles